Identified Guests Tutorial#
This tutorial extends the Anonymous Access tutorial to show how to add identified guests to an OpenVidu Meet room.
An identified guest is a room member with a fixed name and a unique access link that grants access to the room without any login. Each link is meant to be delivered privately to a single person and can be revoked individually.
Building on the Anonymous Access tutorial, it keeps the shared anonymous access links (access as moderator or speaker) and adds the following features:
- Add an identified guest to a room by name, with a base role (
moderatororspeaker). - Each identified guest gets a unique access link that can be copied and shared.
- List and remove the members of a room, revoking their access.
- Access the room through a guest's unique link, with no login required.
The application uses the OpenVidu Meet API to manage rooms and room members, and the OpenVidu Meet WebComponent to embed the meeting.
Anonymous guests vs. explicit members
OpenVidu Meet rooms can be accessed either through shared anonymous links (the moderator/speaker links from the Anonymous Access tutorial) or by adding explicit room members with personalized access and permissions. Identified guests are one of the two kinds of explicit room members (the other being users). See the Room Members feature for the full picture.
Running this tutorial#
1. Run OpenVidu Meet#
You need Docker Desktop. You can install it on Windows , Mac or Linux .
Run this command in Docker Desktop's terminal:
Info
For a detailed guide on how to run OpenVidu Meet locally, visit Try OpenVidu Meet locally .
2. Download the tutorial code#
3. Run the application#
To run this application, you need Node.js (≥ 18) installed on your device.
- Navigate into the application directory
- Install dependencies
- Run the application
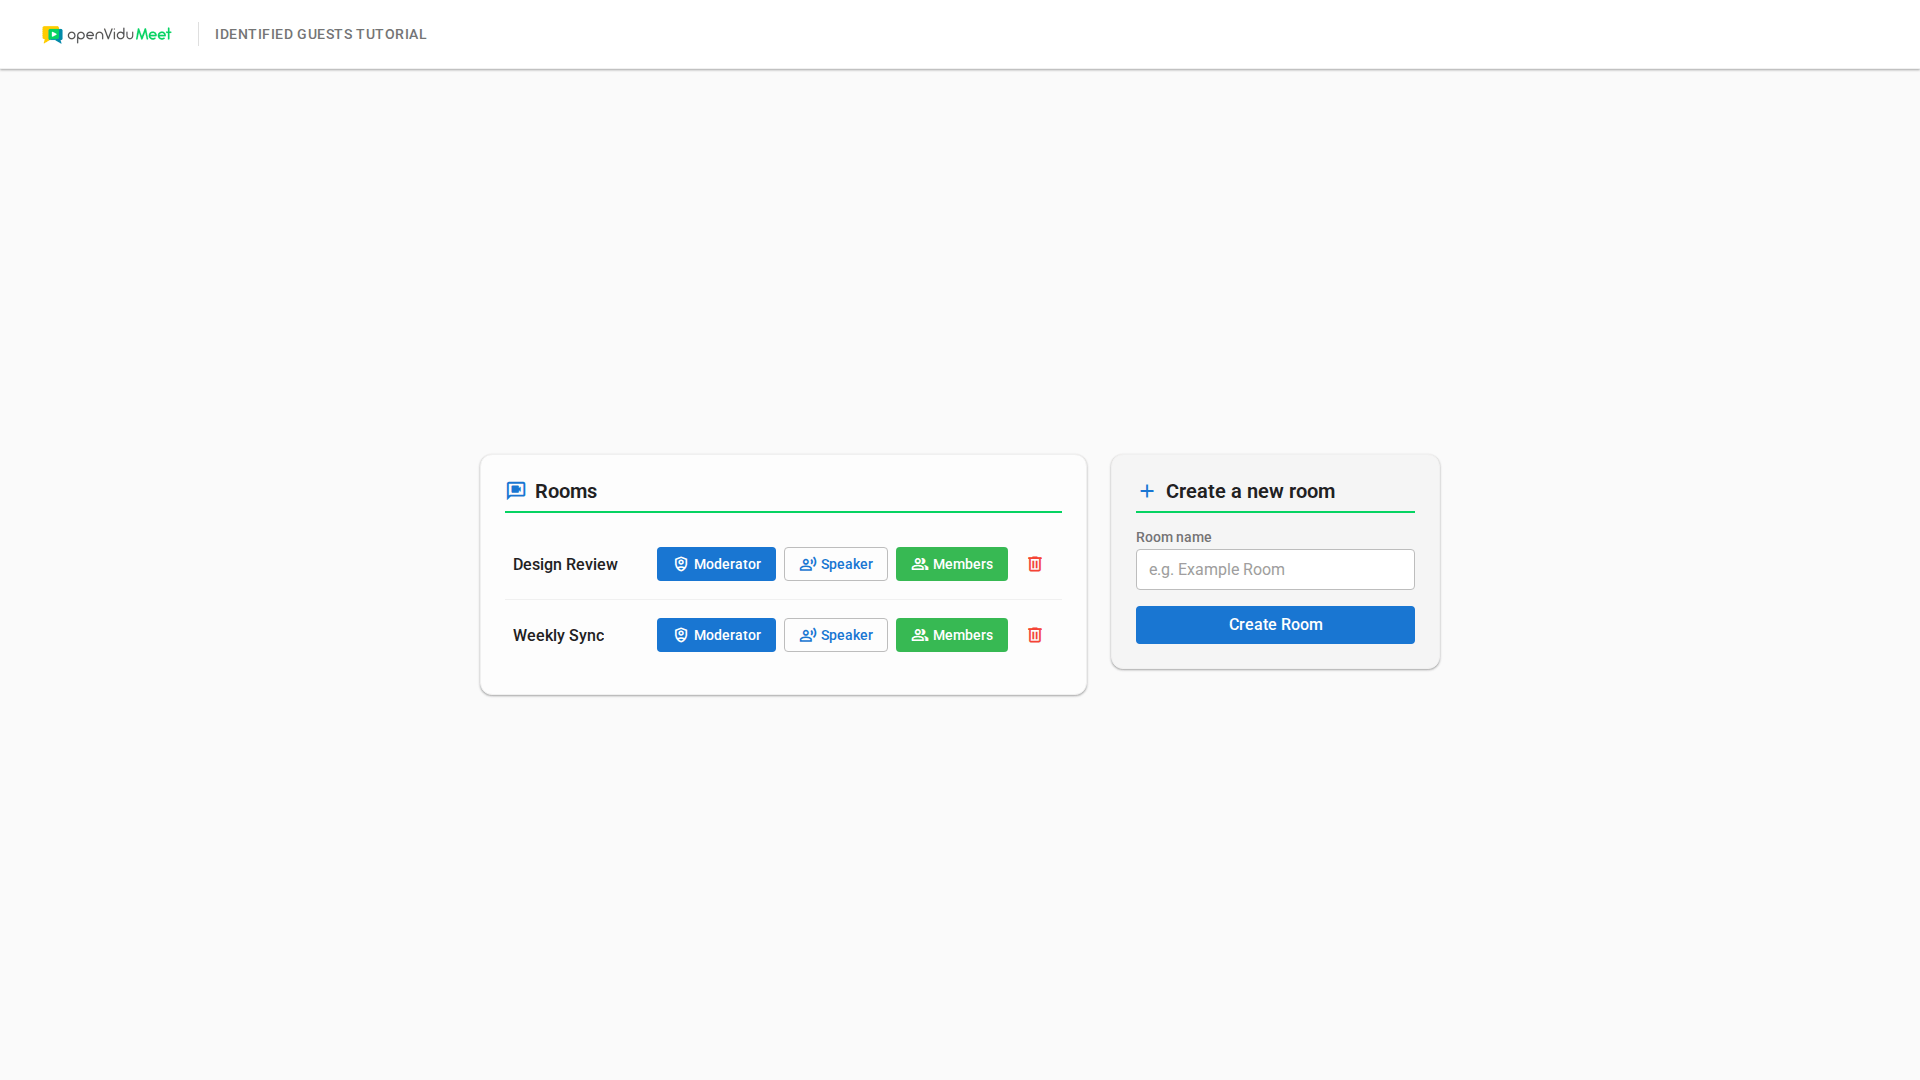
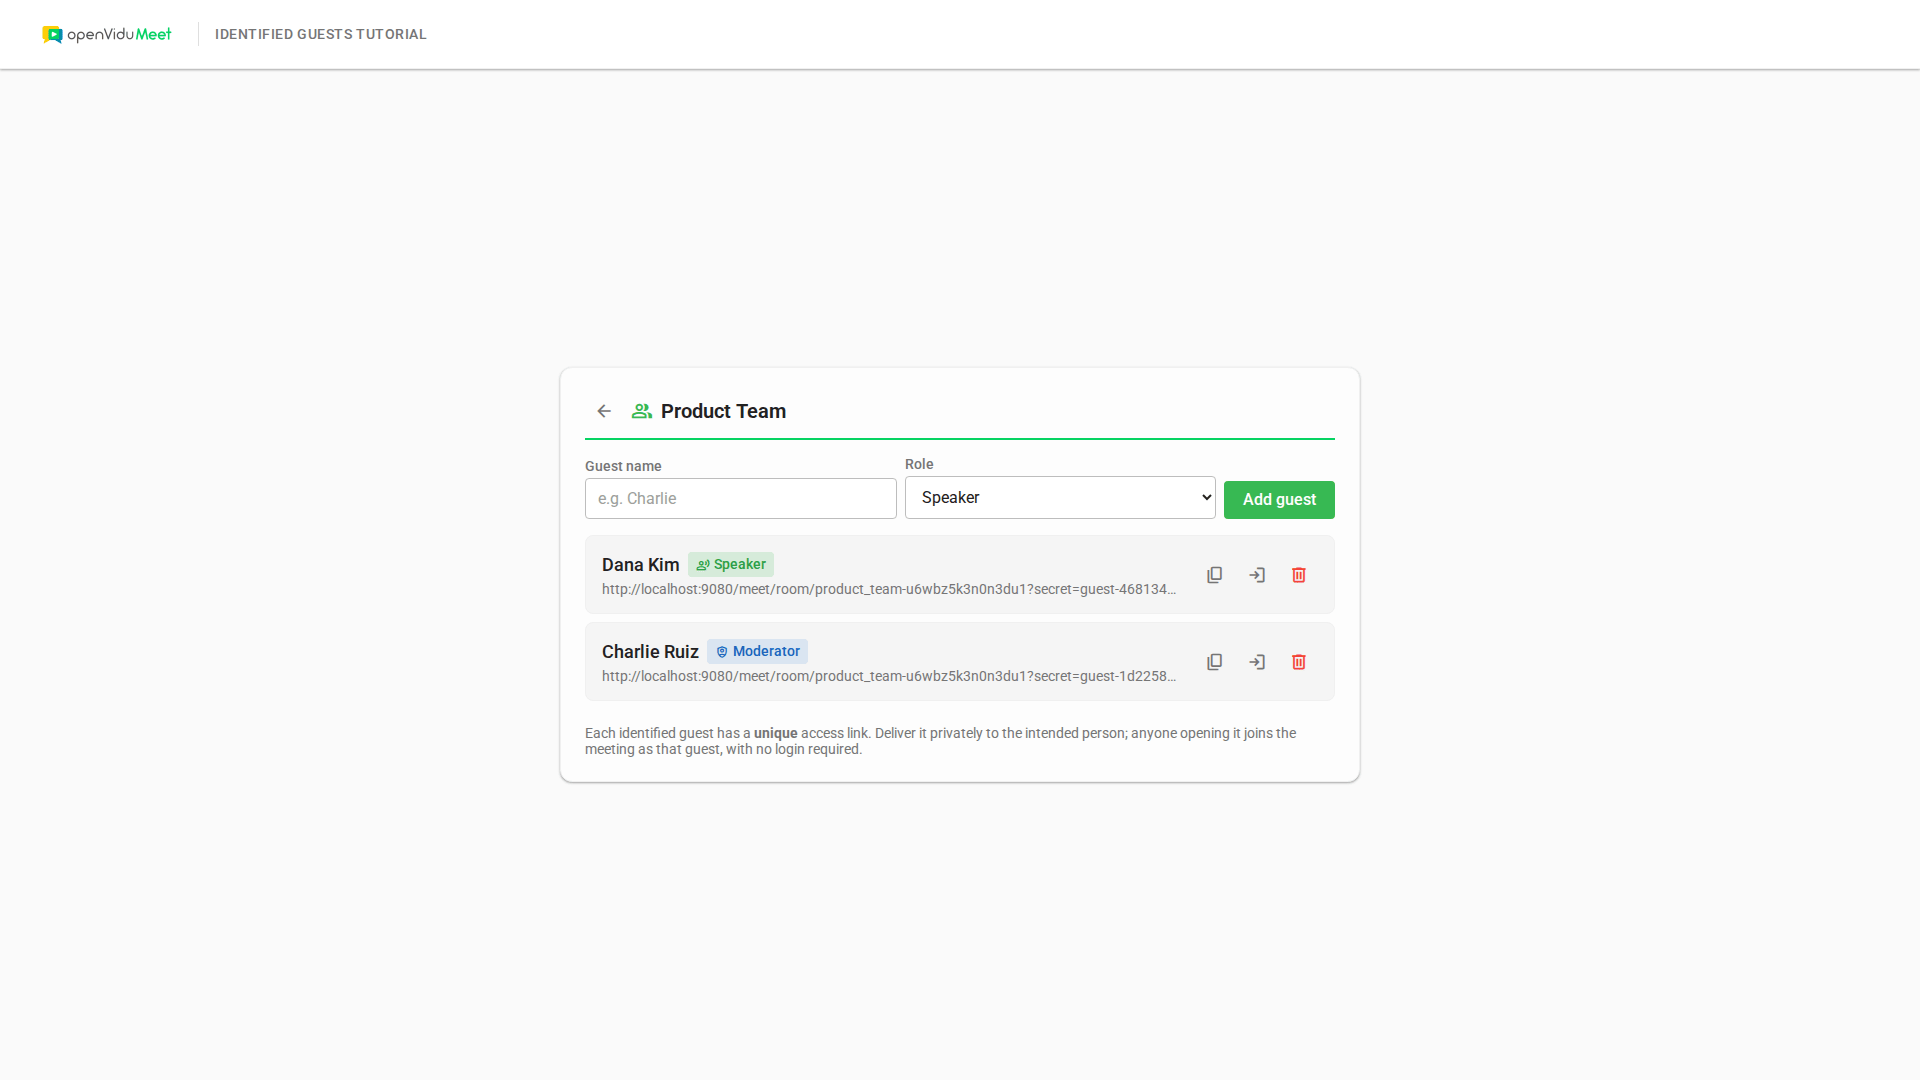
Once the server is up and running, you can test the application by visiting http://localhost:6080. You should see a screen like this:
Understanding the code#
This tutorial builds upon the Anonymous Access tutorial, adding identified guest management. We'll focus on the new features and modifications related to identified guests; the room creation/listing/deletion, the anonymous access links and the WebComponent embedding are inherited from the Anonymous Access tutorial.
Backend modifications#
Besides the usual room endpoints (POST /rooms, GET /rooms, DELETE /rooms/:roomId), the server exposes endpoints to manage the room members:
POST /rooms/:roomId/members: Add an identified guest to a room.GET /rooms/:roomId/members: List the identified guests of a room.DELETE /rooms/:roomId/members/:memberId: Remove a member from a room.
Add an identified guest#
The POST /rooms/:roomId/members endpoint adds an identified guest to a room:
| index.js | |
|---|---|
| |
- The
roomIdis obtained from the request parameters. - The
nameof the identified guest and thebaseRoleare obtained from the request body. - The
nameis the fixed display name the participant will have in the meeting. Providingname(and notuserId) is what tells the API to create a member of typeidentified_guest. - The
baseRole(moderatororspeaker) defines the default set of permissions for the member.
This endpoint adds the identified guest by sending a POST request to the rooms/:roomId/members endpoint. The API responds with the created member, which includes a generated memberId (in the form guest-XXXX) and a unique accessUrl such as http://localhost:9080/meet/room/<roomId>?secret=guest-XXXX. That URL is unique to this member and grants access to the room with no login required.
Info
You can fine-tune the member's permissions beyond the base role by including a customPermissions object in the request. See the addRoomMember operation in the REST API reference for the full list of permissions.
List identified guests#
The GET /rooms/:roomId/members endpoint lists the identified guests of a room:
| index.js | |
|---|---|
| |
- List the room members by sending a
GETrequest to therooms/:roomId/membersendpoint, filtering bytype=identified_guestto retrieve only the identified guests.
Remove a member#
The DELETE /rooms/:roomId/members/:memberId endpoint removes a member, revoking their unique link:
| index.js | |
|---|---|
| |
- Remove the member by sending a
DELETErequest to therooms/:roomId/members/:memberIdendpoint. The member's unique link stops working immediately; if they are currently in the meeting, they are expelled from it.
Frontend modifications#
The home view keeps the shared anonymous access (access as moderator or speaker) and adds a Members button per room, which opens a dedicated members view to manage the room's identified guests.
The room list#
The getRoomListItemTemplate() function renders each room with the inherited anonymous access buttons plus a new Members button:
| app.js | |
|---|---|
| |
The Moderator and Speaker buttons use the room's shared anonymous links (room.access.anonymous.moderator.url and room.access.anonymous.speaker.url) and are inherited from the Anonymous Access tutorial. The new Members button calls manageMembers(), which opens the members view for that room.
Rendering the members list#
The getMemberListItemTemplate() function builds each member item, showing the name, the base role, the unique access link, and buttons to copy the link, access the room and remove the member:
| app.js | |
|---|---|
| |
Each item displays the member's fixed name, a badge with its baseRole, and its unique accessUrl. The three buttons call copyAccessUrl() to copy the link to the clipboard, accessRoom() to access the room in the app through that link, and removeMember() to revoke the member.
Adding an identified guest#
When the "Add guest" form is submitted, the addGuest() function creates the identified guest with the provided name and role:
| app.js | |
|---|---|
| |
- Get the guest's
nameand the chosenbaseRolefrom the form. - Make a
POSTrequest to the/rooms/:roomId/membersendpoint to add the identified guest to the current room. - Add the returned member (including its generated
memberIdand uniqueaccessUrl) to the start of the localmembersmap withprependToMap()(so it appears first, matching the API order) and re-render the list.
Copying the access link#
The copyAccessUrl() function copies the member's unique link to the clipboard and briefly shows a confirmation:
| app.js | |
|---|---|
| |
- Copy the member's unique
accessUrlto the clipboard using the Clipboard API. - Temporarily swap the copy icon for a check icon to confirm the link was copied. This unique link is what you would deliver privately to the intended participant.
Accessing the room#
The accessRoom() function embeds the OpenVidu Meet WebComponent for a given room URL. It is shared by the anonymous access buttons and the per-guest access button:
| app.js | |
|---|---|
| |
- Inject the OpenVidu Meet WebComponent with the
room-urlattribute set to the given URL. For an identified guest this is their uniqueaccessUrl, which already carries the member's secret, so the participant enters the meeting directly with the fixed name and no login. - Add a listener for the
embeddedCloseRequestedevent so that, when the participant asks to close OpenVidu Meet, the component is removed and the previous view is shown again (returnViewIdis#homefor anonymous access or#membersfor an identified guest).
Embedding vs. sharing the link
This tutorial embeds the meeting in the app for convenience while testing, but the main purpose of an identified guest is its unique access link. In a real application you would typically deliver each member's accessUrl privately (by email, message, etc.) instead of opening it yourself, and the participant would access the room directly through that link.
Accessing this tutorial from other computers or phones#
To access this tutorial from other computers or phones, follow these steps:
-
Ensure network connectivity: Make sure your device (computer or phone) is connected to the same network as the machine running OpenVidu Meet and this tutorial.
-
Configure OpenVidu Meet for network access: Start OpenVidu Meet by following the instructions in the Accessing OpenVidu Meet from other computers or phones section.
-
Update the OpenVidu Meet server URL: Modify the
OV_MEET_SERVER_URLenvironment variable in your.envfile to match the URL shown when OpenVidu Meet starts. -
Update the OpenVidu Meet WebComponent script URL: In the
public/index.htmlfile, update the<script>tag that includes the OpenVidu Meet WebComponent to use the same base URL as above. -
Restart the tutorial to apply the changes:
-
Access the tutorial: Open your browser and navigate to
https://192-168-1-100.openvidu-local.dev:6443(replacing192-168-1-100with your actual private IP) on the computer where you started the tutorial or any device in the same network.
Connecting this tutorial to an OpenVidu Meet production deployment#
If you have a production deployment of OpenVidu Meet (installed in a server following deployment steps ), you can connect this tutorial to it by following these steps:
-
Update the server URL: Modify the
OV_MEET_SERVER_URLenvironment variable in the.envfile to point to your OpenVidu Meet production deployment URL. -
Update the API key: Ensure the
OV_MEET_API_KEYenvironment variable in the.envfile matches the API key configured in your production deployment. See Generate an API Key section to learn how to obtain it. -
Update the OpenVidu Meet WebComponent script URL: In the
public/index.htmlfile, update the<script>tag that includes the OpenVidu Meet WebComponent to use the same base URL as above. -
Restart the tutorial to apply the changes:
Make this tutorial accessible from other computers or phones
By default, this tutorial runs on http://localhost:6080 and is only accessible from the local machine. If you want to access it from other computers or phones, you have the following options:
- Use tunneling tools: Configure tools like VS Code port forwarding , ngrok , localtunnel , or similar services to expose this tutorial to the internet with a secure (HTTPS) public URL.
- Deploy to a server: Upload this tutorial to a web server and configure it to be accessible with a secure (HTTPS) public URL. This can be done by updating the source code to manage SSL certificates or configuring a reverse proxy (e.g., Nginx, Apache) to serve it.