OpenVidu Single Node PRO installation: Oracle Cloud Infrastructure#
Oracle Cloud Infrastructure
This section describes two ways to install OpenVidu Single Node on Oracle Cloud Infrastructure:
- Web Console: Can be deployed without installing anything on your machine, but requires more manual steps and has some limitations. For example, recordings are stored on the machine itself rather than in OCI Object Storage.
- Terraform: More powerful and fully automated, but requires the Terraform CLI to be installed on your machine.
Web Console#
This page explains how to create a Compute instance in Oracle Cloud Infrastructure (OCI), configure networking, and prepare it for an OpenVidu Single Node PRO On-Premises installation. Installing, administering, and upgrading OpenVidu Single Node PRO itself is covered in the On-Premises documentation.
Prerequisites#
- An OCI account with permission to create Compute instances and networking resources.
1. Create the Compute instance#
- Log in to your Oracle Cloud Infrastructure account.
-
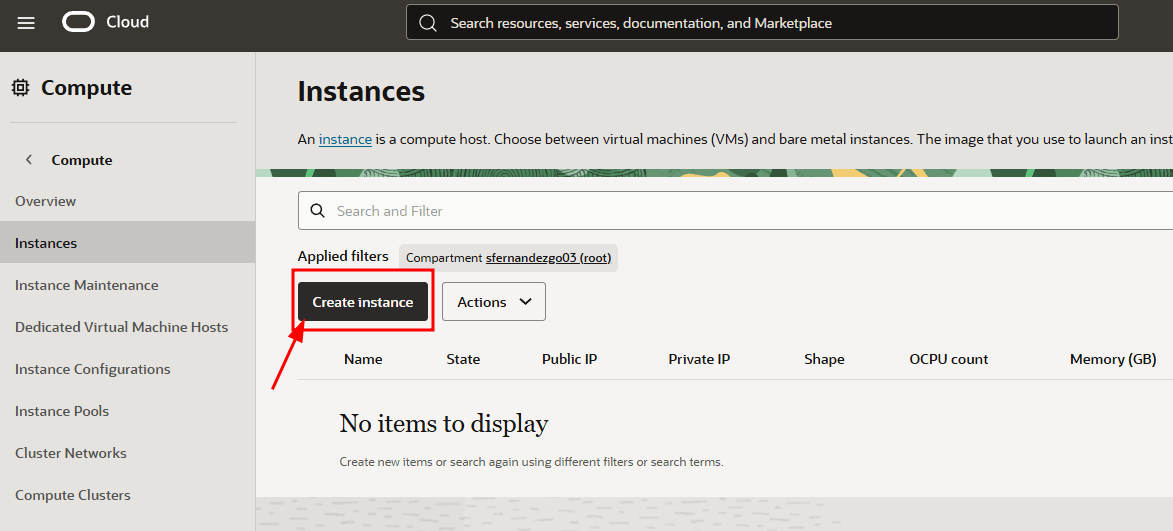
Search for Instances, open it, and click "Create instance".
-
Set a name for the instance (for example,
openvidu-singlenode), or keep the default. -
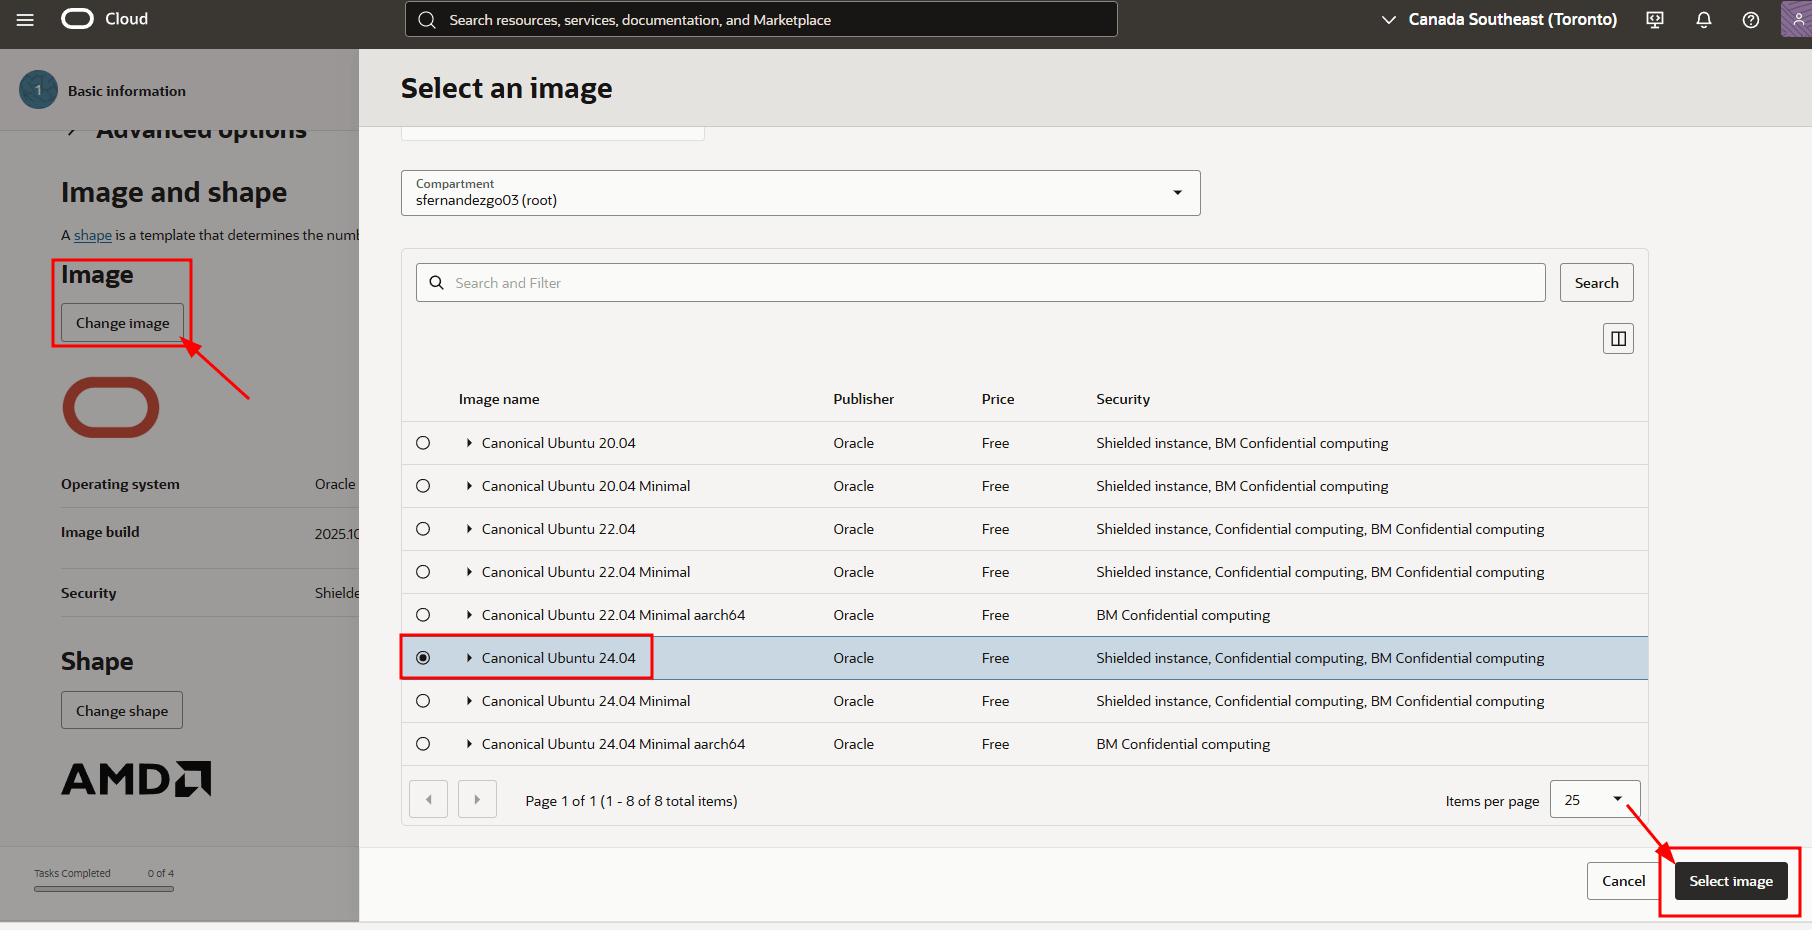
Change the image to "Canonical Ubuntu 24.04".
-
Select the shape for your OpenVidu server. We recommend at least 1 OCPU and 4 GB of RAM for OpenVidu to run correctly. Then click "Next".
Note
ARM-based instances are also supported. OpenVidu supports ARM, and the Always Free-eligible tier includes an ARM instance at no cost.
-
In the Security tab, keep the default options and click "Next".
-
Create a new
VNICwith a newvirtual cloud networkand a newpublic subnet.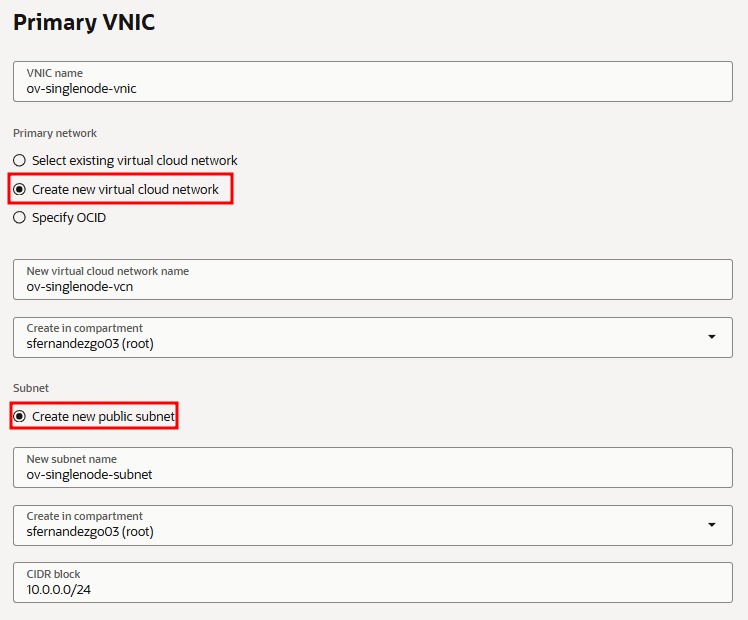
-
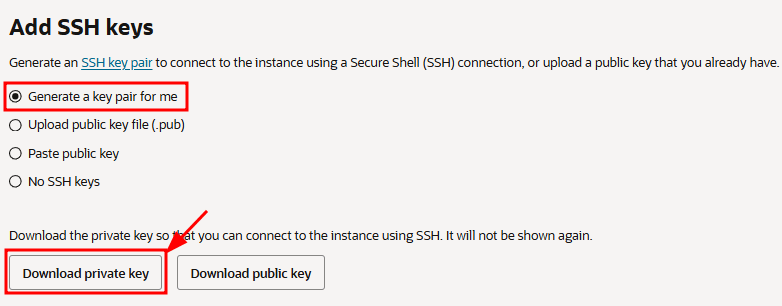
Scroll down and download the private key for the instance so you can connect via SSH. Then click "Next".
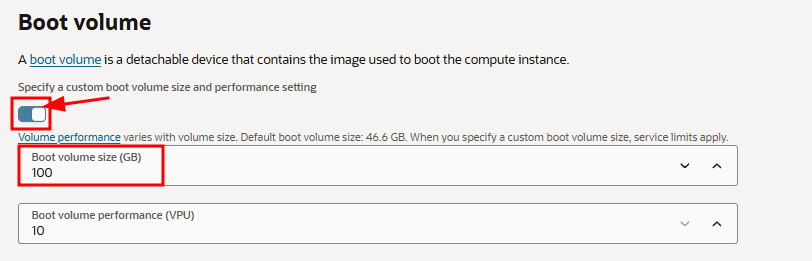
-
In the Storage tab, select "Specify a custom boot volume size" and set it to 100 GB instead of the default 50 GB. You can keep 50 GB, but OpenVidu may fail due to insufficient disk space. Then click "Next".
-
Review the configuration and click "Create".
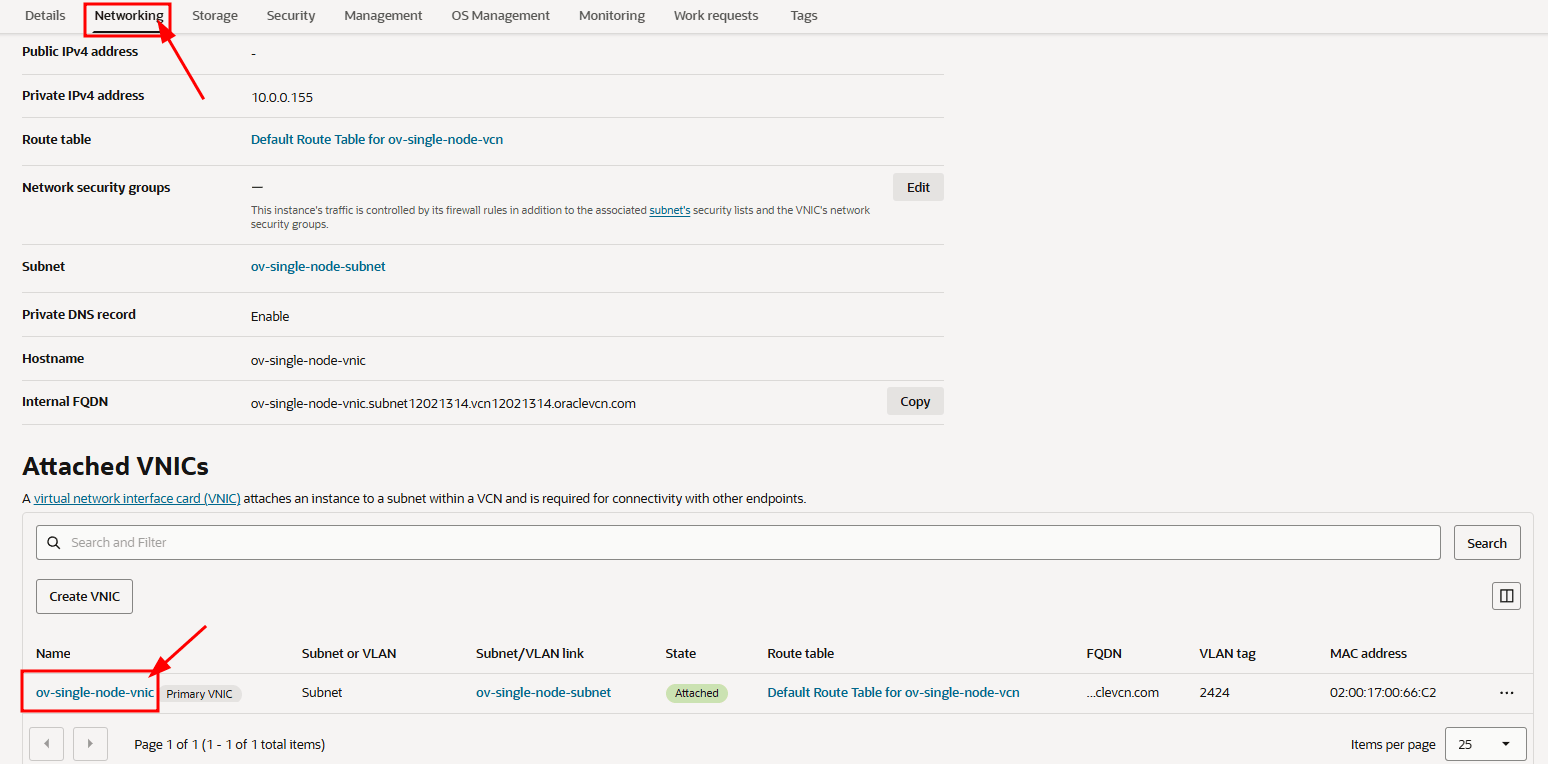
2. Attach a public IP address to the instance#
-
Open the instance details, navigate to the VNIC resource, and go to the "Networking" tab.
-
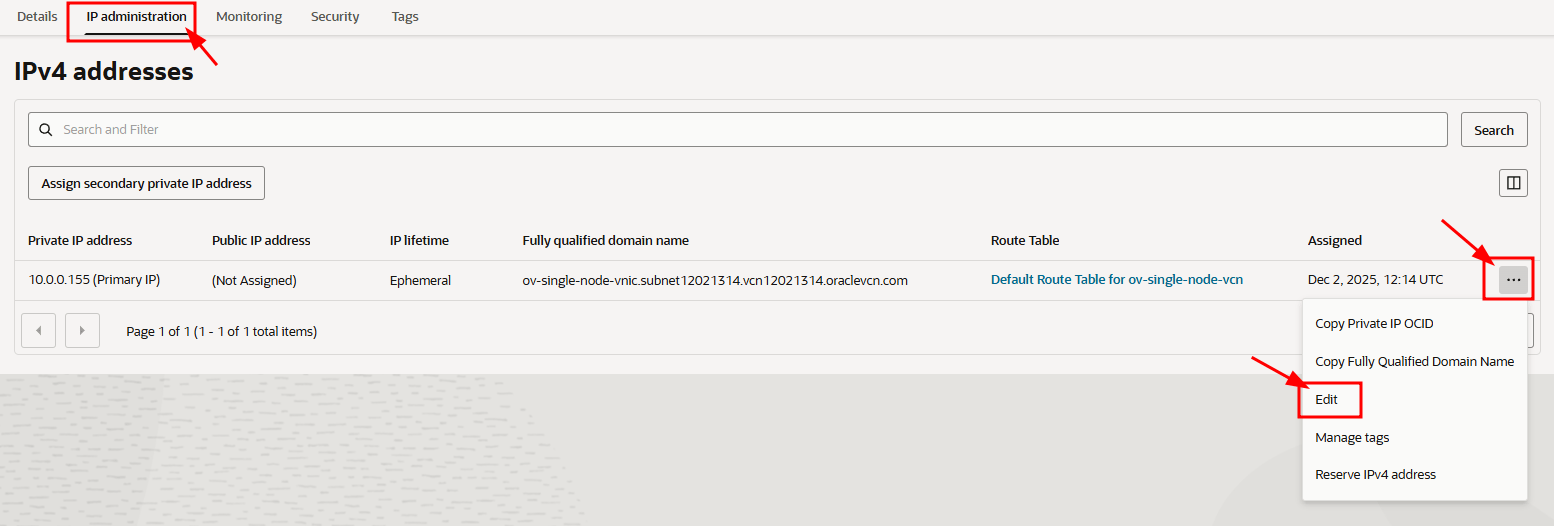
Open the "IP administration" tab. In the row of the existing IPv4 address, click the three-dots menu and select "Edit".
-
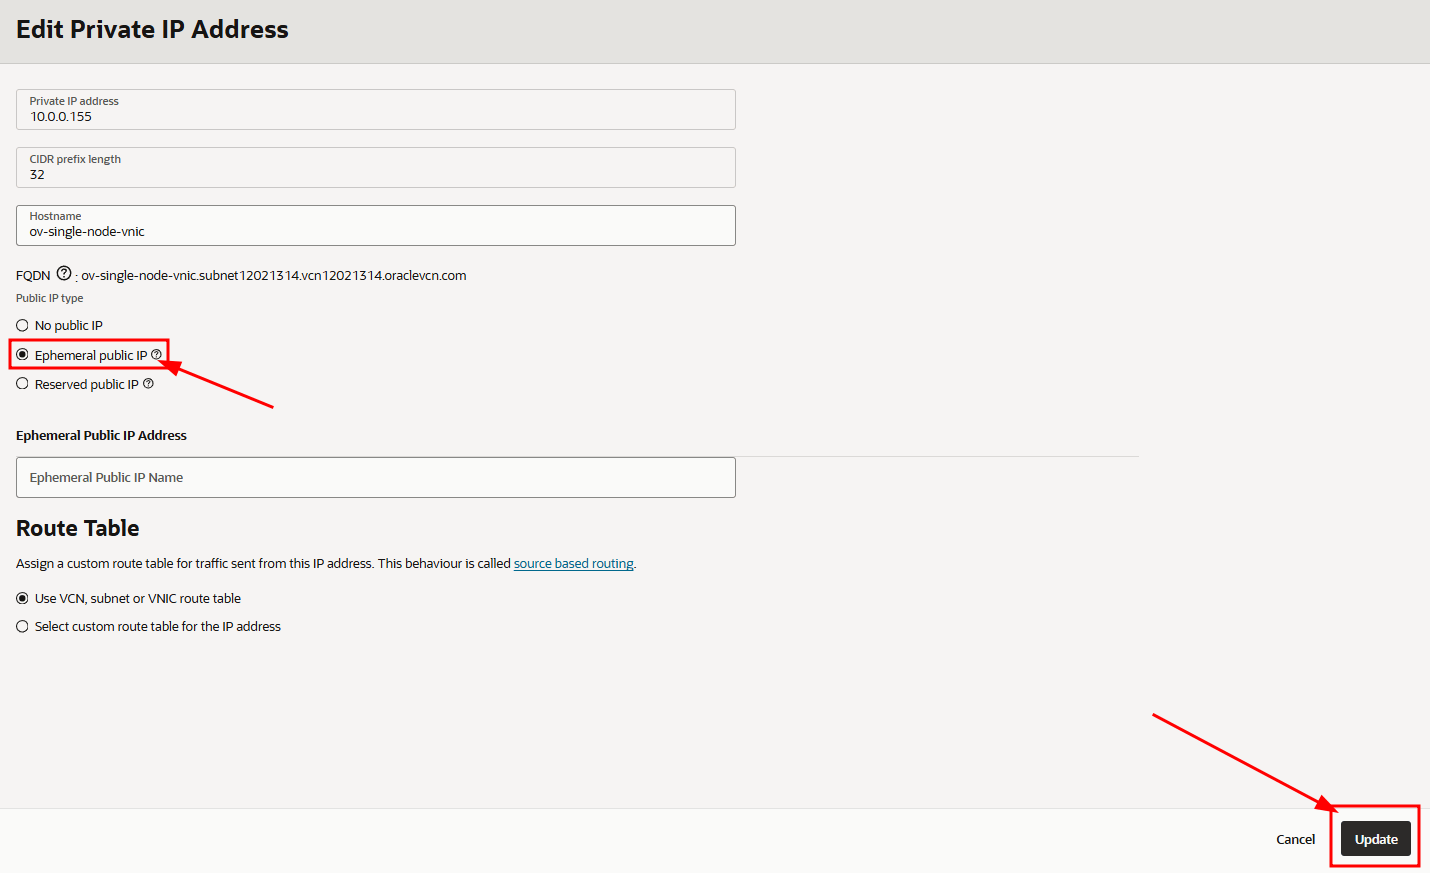
Select "Ephemeral public IP" and click "Update".
3. Port rules in the network security lists#
OpenVidu and WebRTC require specific inbound rules on both the instance network security (OCI NSG or subnet security list) and the instance firewall (configured later).
The minimum inbound ports to allow must be included in the security list rules.
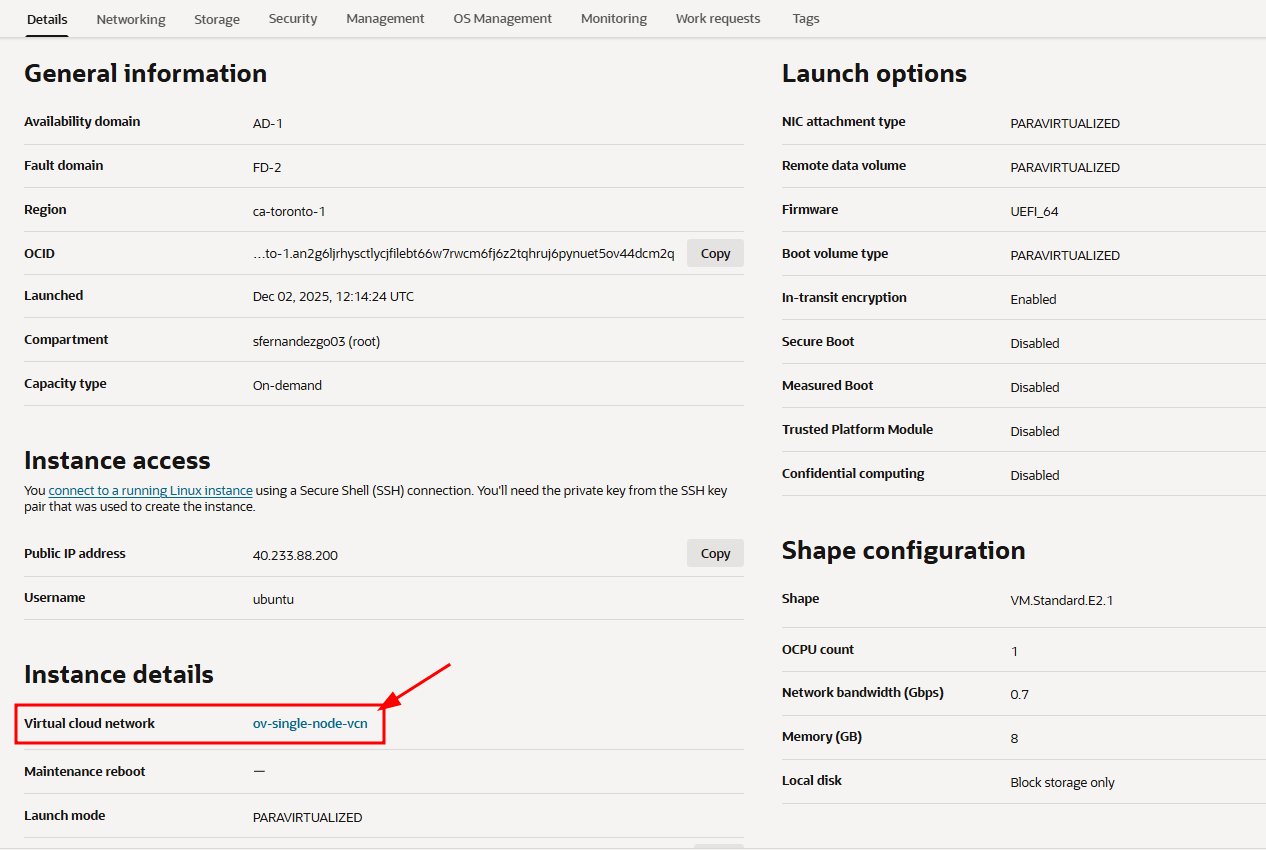
-
From the instance "Details" page, click the "Virtual cloud network" resource.
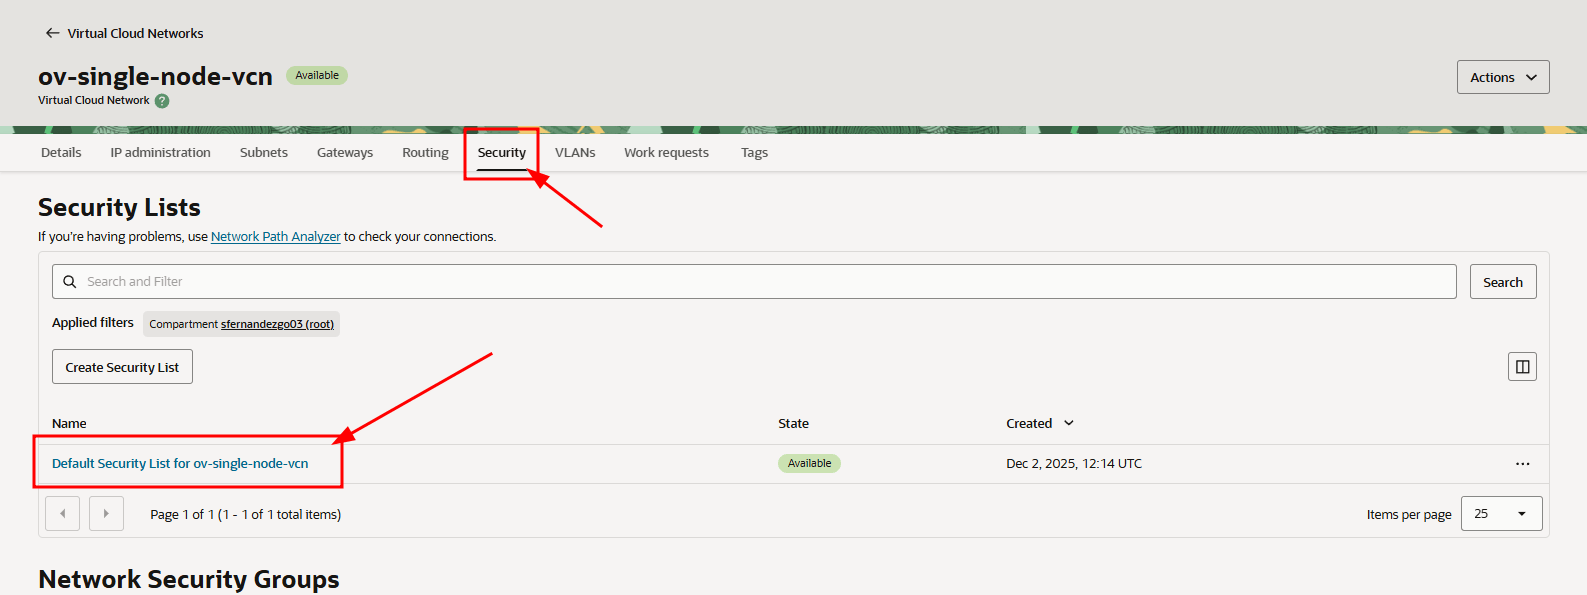
-
Go to the "Security" tab and click the default security list.
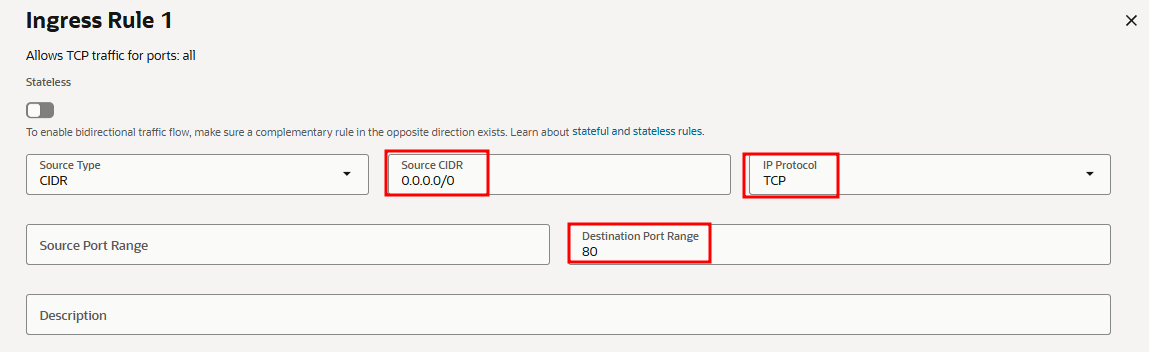
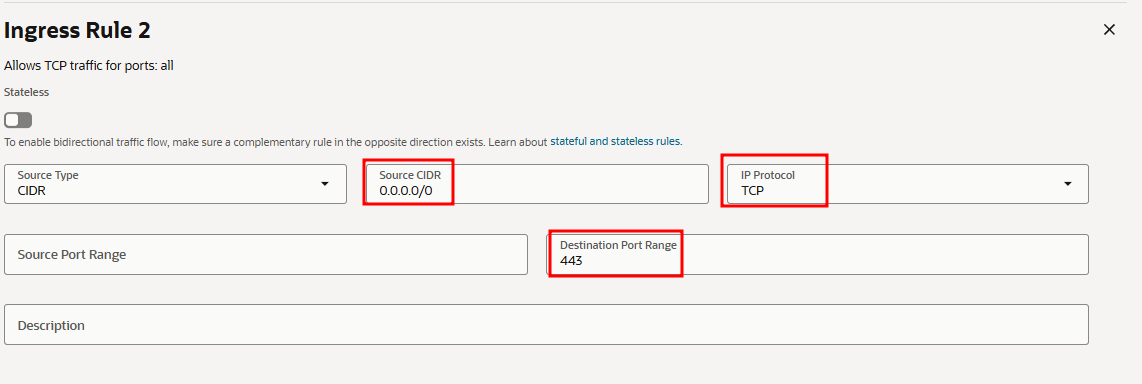
-
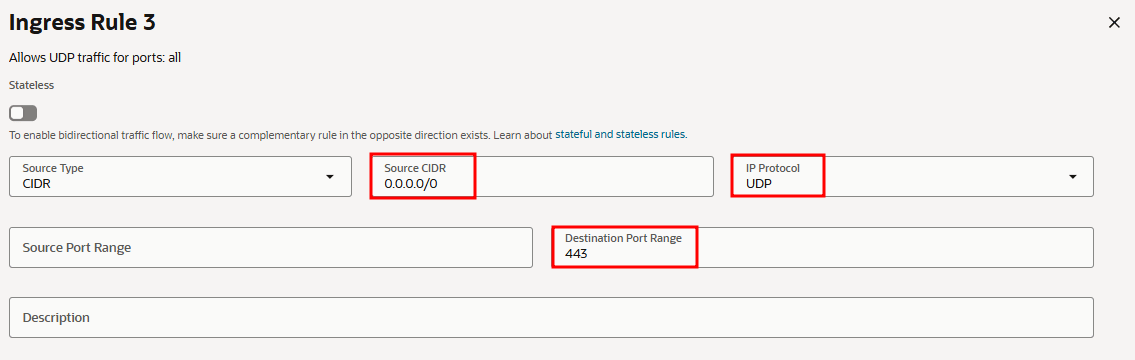
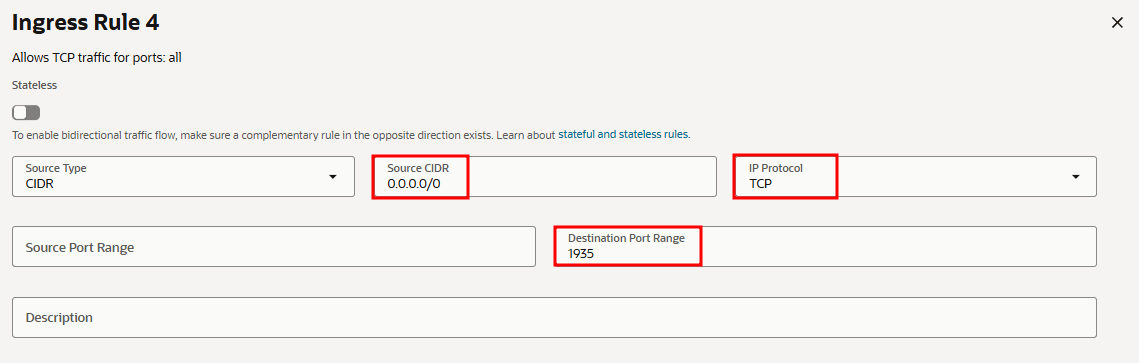
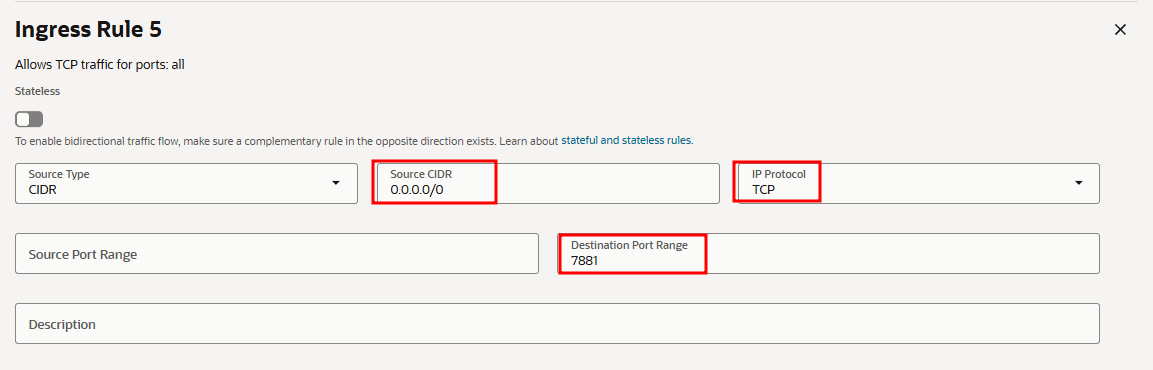
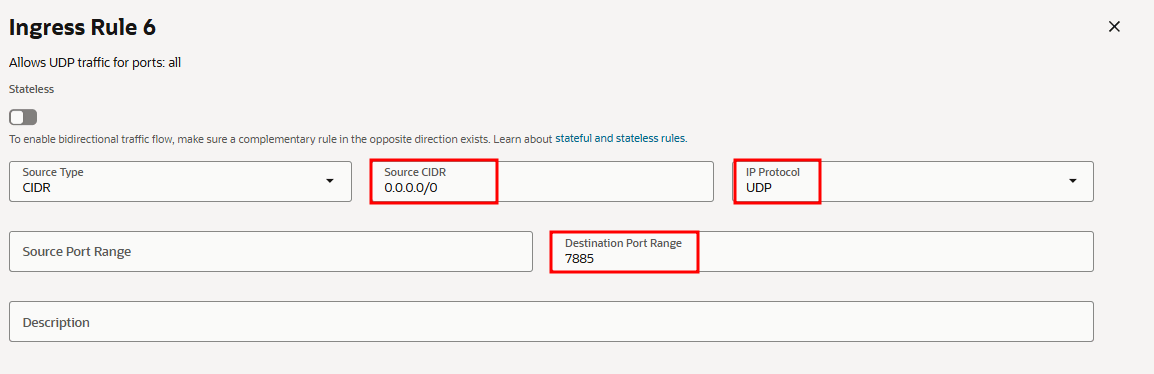
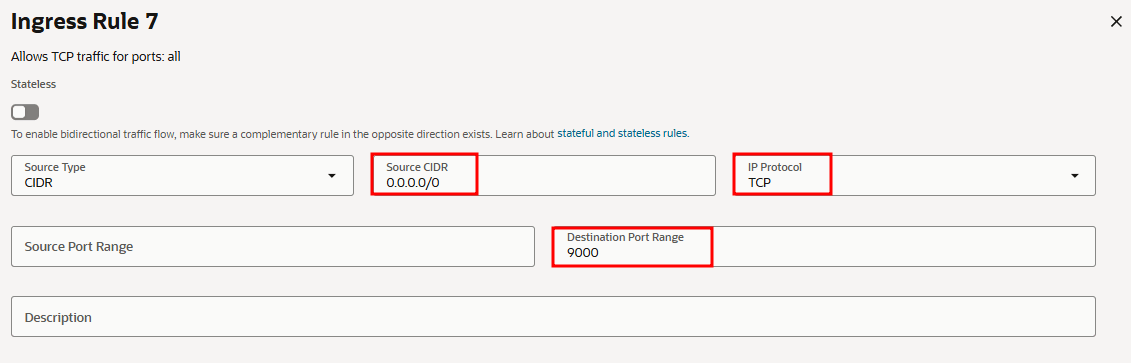
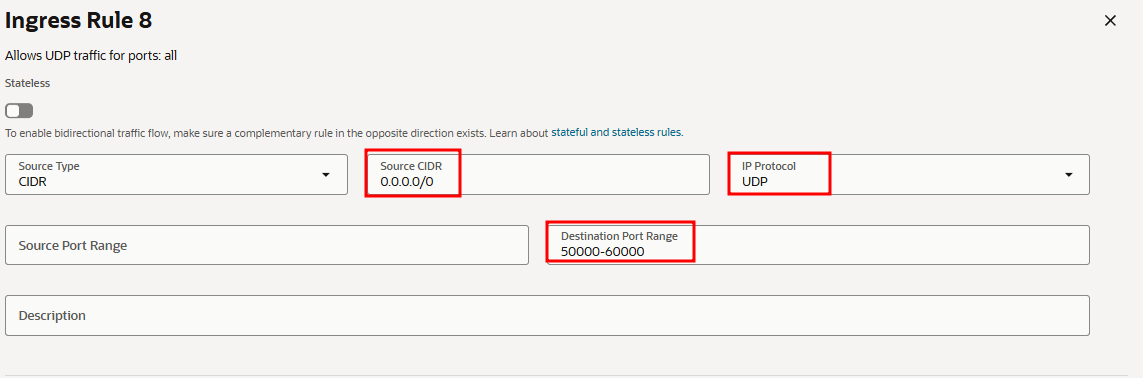
In the "Security Rules" tab, add the following Ingress rules.
Ingress Rules
4. SSH access, OpenVidu installation, and firewall rules#
Warning
Open the required ports in the OS firewall before installing OpenVidu to avoid connectivity issues.
-
SSH into the instance:
-
Install and start the
firewalldtool: -
Clear the existing
iptablesrules, set the default input policy to ACCEPT, disableiptablespersistence at startup, and restart the network service if required: -
Add the required firewall rules:
firewall-cmd --add-port=80/tcp firewall-cmd --permanent --add-port=80/tcp firewall-cmd --add-port=443/tcp firewall-cmd --permanent --add-port=443/tcp firewall-cmd --add-port=443/udp firewall-cmd --permanent --add-port=443/udp firewall-cmd --add-port=1935/tcp firewall-cmd --permanent --add-port=1935/tcp firewall-cmd --add-port=7881/tcp firewall-cmd --permanent --add-port=7881/tcp firewall-cmd --add-port=7885/udp firewall-cmd --permanent --add-port=7885/udp firewall-cmd --add-port=9000/tcp firewall-cmd --permanent --add-port=9000/tcp firewall-cmd --add-port=50000-60000/udp firewall-cmd --permanent --add-port=50000-60000/udp -
Apply the rules and verify they are correctly configured:
-
Follow the On-Premises install instructions to install OpenVidu PRO on the instance.
5. Administration and upgrade#
- For administration of this OpenVidu Single Node PRO deployment, see the Administration section.
- To upgrade OpenVidu, see the Upgrade section.
Terraform#
This section contains instructions for deploying a production-ready OpenVidu Single Node PRO deployment on Oracle Cloud Infrastructure. The deployed services are the same as in the On-Premises Single Node installation, but the process is fully automated through the Terraform CLI. OCI Object Storage is used to store recordings and other persistent data.
Prerequisites#
- An Oracle Cloud Infrastructure account with the required permissions to create Compute instances, VCNs, and Object Storage buckets.
- The Terraform CLI installed on your machine.
- Git installed on your machine.
The deployment architecture is as follows:

Deployment details#
-
Clone the OpenVidu repository containing the Terraform files:
-
Copy
terraform.tfvars.exampletoterraform.tfvars, update the required parameters with your values, and adjust any optional defaults as needed.
Information about parameters
Mandatory Parameters
Input Value Description tenancy_ocidOCI Tenancy OCID. Required for the Object Storage namespace. compartment_ocidOCI Compartment OCID where resources will be created. user_ocidOCI User OCID used to create Customer Secret Keys for S3-compatible access to Object Storage. stackNameStack name for the OpenVidu deployment. openviduLicenseOpenVidu PRO license key. Visit https://openvidu.io/account to obtain your license. Optional Parameters
Input Value Default Value Description region"eu-frankfurt-1"OCI region where resources will be created. availability_domain1Availability Domain number (1, 2, or 3) to use for resources. instanceType"VM.Standard.E4.Flex"OCI Compute shape for the OpenVidu instance. instanceOCPUs4Number of OCPUs for the instance (applies to Flex shapes only). instanceMemory4Memory in GB for the instance (applies to Flex shapes only). certificateType"letsencrypt"Certificate type for the OpenVidu deployment. Options: selfsigned- Not recommended for production use. Intended for testing or development environments only. A FQDN is not required.owncert- Suitable for production environments. Uses your own certificate. A FQDN is required.letsencrypt- Suitable for production environments. Can be used with or without a FQDN (if no FQDN is provided, the public IP is used as the domain name and a Let's Encrypt certificate is issued for it).
domainName(none)Domain name for the OpenVidu deployment. Optional — if not provided, the public IP is used as the domain name. ownPublicCertificate(none)If the certificate type is owncert, this parameter specifies the public certificate in base64 format.ownPrivateCertificate(none)If the certificate type is owncert, this parameter specifies the private certificate in base64 format.initialMeetAdminPassword(none)Initial password for the adminuser in OpenVidu Meet. Alphanumeric characters, underscores or hyphens only (A-Z, a-z, 0-9, _, -). If not provided, a random password will be generated.initialMeetApiKey(none)Initial API key for OpenVidu Meet. Alphanumeric characters, underscores or hyphens only (A-Z, a-z, 0-9, _, -). If not provided, no API key will be set; one can be configured later from the Meet Console. bucketName(none)Name of the OCI Object Storage bucket for application data and recordings. If left empty, a bucket will be created with a default name. RTCEngine"pion"WebRTC media engine to use. Options: pion- Default media engine.mediasoup- Alternative media engine with different performance characteristics.
vault_ocid(none)OCI KMS Vault OCID for secrets management. If left empty, a new vault will be created. key_ocid(none)OCI KMS Key OCID for secrets management. If left empty, a new key will be created. additionalInstallFlags(none)Additional optional flags to pass to the OpenVidu installer (comma-separated, e.g., --flag1=value, --flag2). -
Deploy with Terraform using the following commands:
-
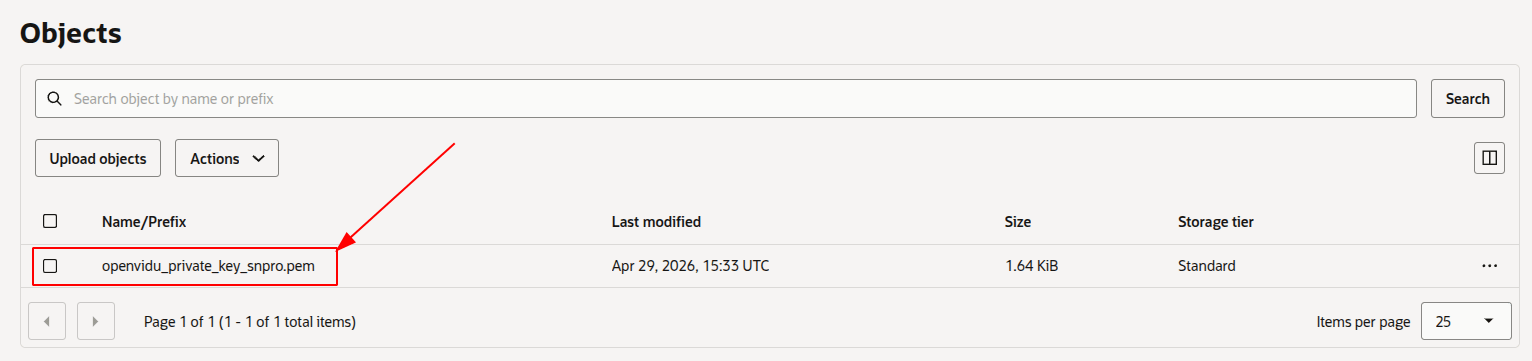
Logs will appear in the
terraform applyconsole output. Wait for it to finish and displayApply Complete!. Then go to OCI Object Storage and wait for the SSH key to appear in your configured bucket.Warning
After downloading the SSH key, it is strongly recommended to DELETE IT from the bucket. This file is the private key used to access the instance — if exposed, unauthorized users could gain access.
-
Set the correct permissions on the SSH key so it can be used.
Access OpenVidu#
To verify that your OpenVidu deployment is working correctly, check the credentials in the OCI Vault Secrets Manager.
- Navigate to the OCI Secrets Manager in the OCI Console.
- Click the secret you want to view.
-
Scroll down to "Versions", click the "3 dots" menu next to the current version, and select "View secret contents".
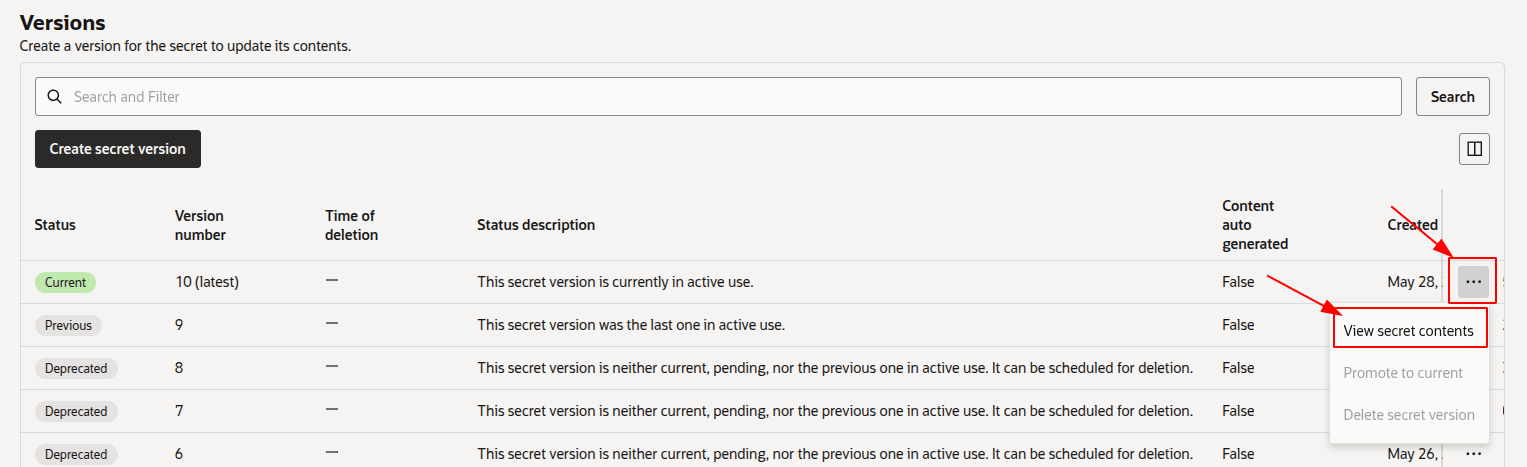
Warning
Click "Show decoded Base64 digit" to see the actual value of the secret.
SSH into the instance by running the following command from the directory where your SSH key is located:
Then navigate to /opt/openvidu/config/ where you will find all credentials in the following files:
openvidu.envmeet.env
Open OPENVIDU_URL and you will see the OpenVidu Meet interface.
Log in with MEET_INITIAL_ADMIN_PASSWORD to start using OpenVidu Meet.
Configure your application to use the deployment#
To configure your OpenVidu application, you will need your OCI credentials. You can retrieve them by following the steps in View OpenVidu credentials in the Web or View OpenVidu credentials in the instance.
Your authentication credentials and the URL to point your applications to are:
OpenVidu Meet:
OPENVIDU_URL: The URL used to access OpenVidu Meet, alwayshttps://yourdomain.example.io/.MEET_INITIAL_ADMIN_USER: The user account for accessing the OpenVidu Meet Console. Alwaysadmin.MEET_INITIAL_ADMIN_PASSWORD: The password for accessing the OpenVidu Meet Console.MEET_INITIAL_API_KEY: The API key for using the OpenVidu Meet Embedded and OpenVidu Meet REST API.
Note
MEET_INITIAL_ADMIN_USER, MEET_INITIAL_ADMIN_PASSWORD, and MEET_INITIAL_API_KEY are initial settings only. Changing them here will not affect the deployment — they can only be modified from the Meet Console.
OpenVidu Platform:
LIVEKIT_URL: The URL used with LiveKit SDKs. This can be eitherwss://yourdomain.example.io/orhttps://yourdomain.example.io/, depending on the client library you are using.LIVEKIT_API_KEY: The API key for LiveKit SDKs.LIVEKIT_API_SECRET: The API secret for LiveKit SDKs.
Troubleshooting initial Oracle Cloud Infrastructure deployment#
If something goes wrong during the initial Oracle Cloud Infrastructure deployment, you will not be able to reach the OPENVIDU_URL. This can happen due to a misconfiguration in the parameters, insufficient permissions, or a problem with OCI services. The steps below will help you troubleshoot the issue and identify the root cause:
- Check whether the instance is running. If it is not, review the output of the
terraform applycommand for any errors. -
If the instance is running, SSH into it and inspect the logs by running the following command:
These logs contain detailed information about the Oracle Cloud Infrastructure deployment process.
-
If everything appears to be in order, check the status and logs of the installed OpenVidu services.
Configuration and administration#
Once OPENVIDU_URL is reachable, the deployment is complete and working. See the Administration section to learn how to manage your deployment.