iOS Tutorial#
This tutorial is a simple video-call application built for iOS, using Swift, that allows:
- Joining a video call room by requesting a token from any application server.
- Publishing your camera and microphone.
- Subscribing to all other participants' video and audio tracks automatically.
- Leaving the video call room at any time.
It uses the LiveKit Swift SDK to connect to the LiveKit server and interact with the video call room.
Running this tutorial#
1. Run OpenVidu Server#
-
Download OpenVidu
-
Configure the local deployment
-
Run OpenVidu
To use a production-ready OpenVidu deployment, visit the official deployment guide.
Configure Webhooks
All application servers have an endpoint to receive webhooks from OpenVidu. For this reason, when using a production deployment you need to configure webhooks to point to your local application server in order to make it work. Check the Send Webhooks to a Local Application Server section for more information.
2. Download the tutorial code#
3. Run a server application#
To run this server application, you need Node.js installed on your device.
- Navigate into the server directory
- Install dependencies
- Run the application
For more information, check the Node.js tutorial.
To run this server application, you need Go installed on your device.
- Navigate into the server directory
- Run the application
For more information, check the Go tutorial.
To run this server application, you need Ruby installed on your device.
- Navigate into the server directory
- Install dependencies
- Run the application
For more information, check the Ruby tutorial.
To run this server application, you need Java and Maven installed on your device.
- Navigate into the server directory
- Run the application
For more information, check the Java tutorial.
To run this server application, you need Python 3 installed on your device.
-
Navigate into the server directory
-
Create a python virtual environment
-
Activate the virtual environment
-
Install dependencies
-
Run the application
For more information, check the Python tutorial.
To run this server application, you need Rust installed on your device.
- Navigate into the server directory
- Run the application
For more information, check the Rust tutorial.
To run this server application, you need PHP and Composer installed on your device.
- Navigate into the server directory
- Install dependencies
- Run the application
Warning
LiveKit PHP SDK requires library BCMath . This is available out-of-the-box in PHP for Windows, but a manual installation might be necessary in other OS. Run sudo apt install php-bcmath or sudo yum install php-bcmath
For more information, check the PHP tutorial.
To run this server application, you need .NET installed on your device.
- Navigate into the server directory
- Run the application
Warning
This .NET server application needs the LIVEKIT_API_SECRET env variable to be at least 32 characters long. Make sure to update it here and in your OpenVidu Server.
For more information, check the .NET tutorial.
4. Run the client application#
To run the client application tutorial, you need Xcode installed on your MacOS.
-
Launch Xcode and open the
OpenViduIOS.xcodeprojthat you can find underopenvidu-livekit-tutorials/application-client/openvidu-ios. -
Run the application in an emulator or a physical device by clicking on the menu Product > Run or by ⌘R.
Emulator limitations
Publishing the camera track is not supported by iOS Simulator.
If you encounter code signing issues, make sure you change the Team and bundle id from the previous step.
The application will initiate as a native iOS application. Once the app is opened, you should see a screen like this:
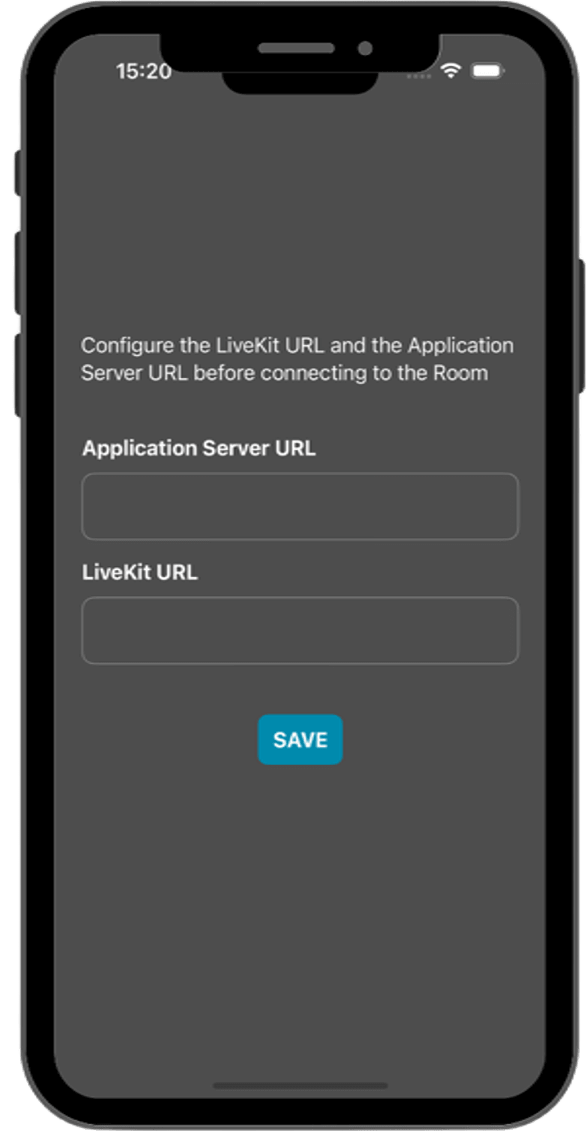
This screen allows you to configure the URLs of the application server and the LiveKit server. You need to set them up for requesting tokens to your application server and connecting to the LiveKit server.
Connecting real iOS device to application server running in you local network
One advantage of running OpenVidu locally is that you can test your application client in a real iOS device and be able to reach the application server very easily without worrying about SSL certificates if they are both running in the same local network. For more information, see section Accessing your local deployment from other devices on your network.
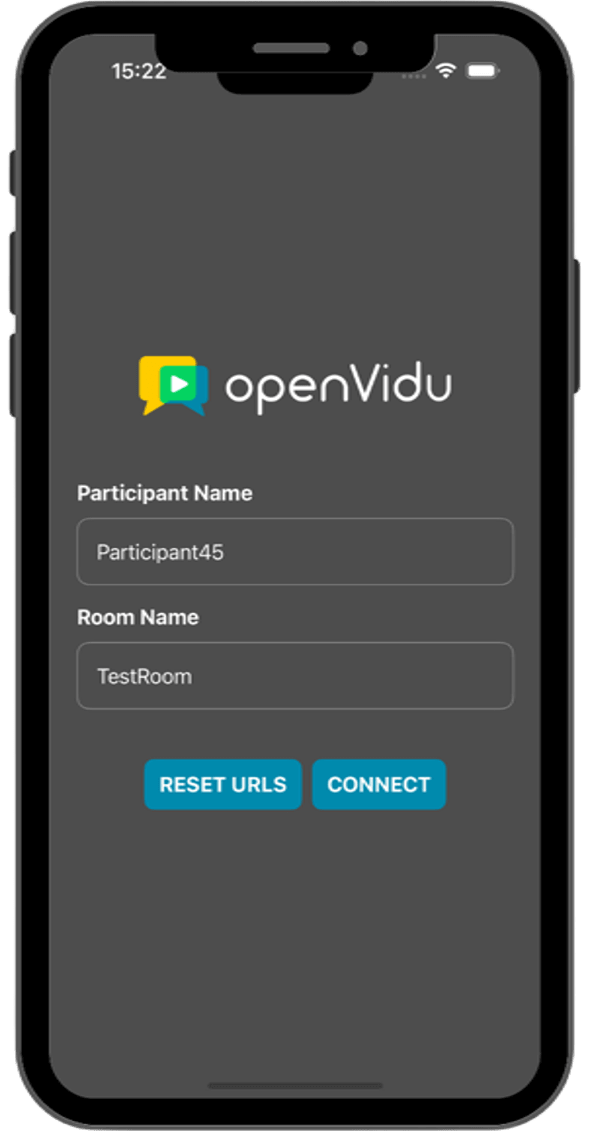
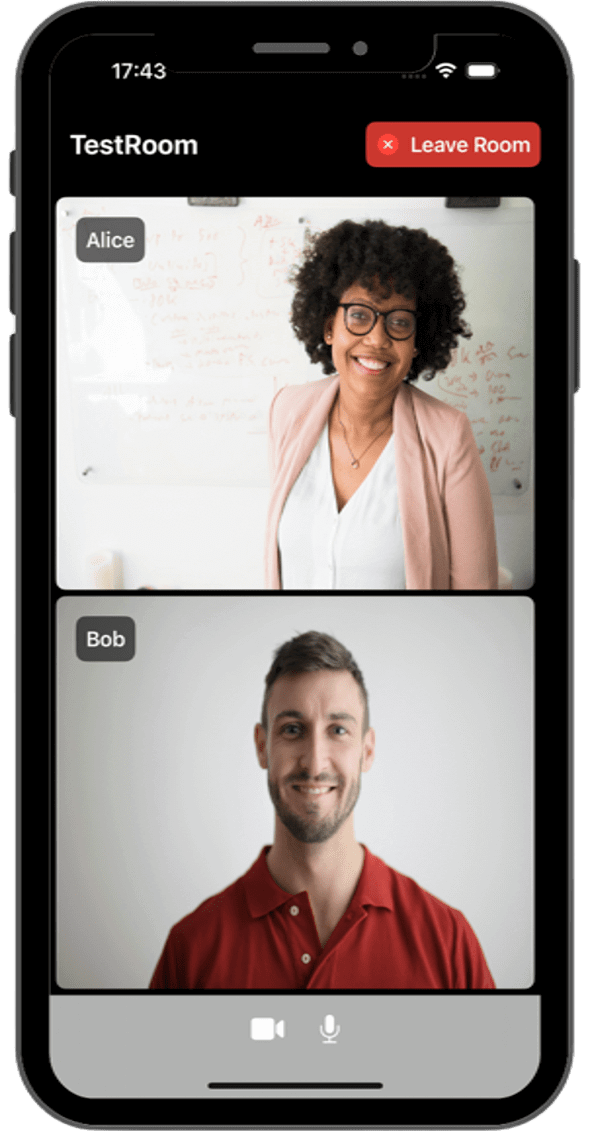
Once you have configured the URLs, you can join a video call room by providing a room name and a user name. After joining the room, you will be able to see your own video and audio tracks, as well as the video and audio tracks of the other participants in the room.
Understanding the Code#
This iOS project, created with Xcode and written in Swift, includes various files and directories. For this tutorial, focus on the following key components within the openvidu-ios/Shared directory:
OpenViduApp.swift: Initializes the application and sets up the main view.Support: Contains files for secure storage, token management, and other support functions.Utils: Includes utility files likeHttpClient.swiftfor HTTP networking.Views: Houses the user interface components of the application.Contexts: Manages application state and room contexts for LiveKit interaction.Assets.xcassets: Stores images and color assets used in the app.
Integrating LiveKit#
To use LiveKit in your iOS app, you need to add the LiveKit Swift SDK as a Swift Package. You can do this using either Package.swift or Xcode.
Adding LiveKit via Package.swift#
- Open your
Package.swiftfile. - Add LiveKit to the
dependenciesarray. - Include LiveKit in the
targetsarray.
Example Package.swift:
// swift-tools-version:5.3
import PackageDescription

let package = Package(
    name: "MyApp",
    platforms: [.iOS(.v14)],
    dependencies: [
        .package(name: "LiveKit", url: "https://github.com/livekit/client-sdk-swift.git", .upToNextMajor(from: "2.0.12"))
    ],
    targets: [
        .target(
            name: "MyApp",
            dependencies: ["LiveKit"]
        )
    ]
)
Adding LiveKit via Xcode#
- Open your Xcode project.
- Go to Project Settings.
- Select the Swift Packages tab.
- Click the + button to add a new package.
- Enter the URL:
https://github.com/livekit/client-sdk-swift. - Choose the version you want, such as "Up to Next Major Version" with
2.0.12.
iOS Specific Requirements#
To test the application on an iOS device, you need to ensure it has permission to access the camera and microphone. These configurations are already included in this project. However, if you're starting a new project, follow these steps:
-
Add Permissions to
Info.plistInclude the following keys in your
Info.plistfile to request access to the camera and microphone: -
Automatic Permission Requests
The app will automatically request these permissions when it runs.
-
Check Permissions
To verify if the permissions were granted, use the
AVCaptureDevice.requestAccess(for: .video)method:
Configuring URLs#
The ConfigureUrlsView.swift file defines a SwiftUI view for configuring the URLs required for the application:
applicationServerUrl: The URL of the application server used to obtain tokens for joining the video call room.livekitUrl: The URL of the LiveKit server used to connect to the video call room and handle video communication.
You should configure these URLs according to your deployment settings. If you are running OpenVidu locally, you can set applicationServerUrl to https://xxx-yyy-zzz-www.openvidu-local.dev:6443 and livekitUrl to wss://xxx-yyy-zzz-www.openvidu-local.dev:7443, where xxx-yyy-zzz-www represents the LAN private IP address of the machine running OpenVidu, with dashes (-) instead of dots (.).
If these URLs are left empty, the user will be prompted to enter them when the application starts. This configuration is managed in the ConfigureUrlsView.swift file:
When the user clicks the Save button, the LKButton action triggers the validation and saves the URLs into the AppContext and RoomContext. The ConfigureUrlsView handles this logic:
| ConfigureUrlsView.swift | |
|---|---|
| |
In this code snippet, the isValidURL function checks the validity of the URLs. If both URLs are valid, they are saved into the appCtx and roomCtx contexts. If any URL is invalid, an error message is displayed.
Joining a room#
Before joining a room, the ConnectView.swift defines the view for the connection screen. It includes a logo, text fields for participant name and room name, and buttons for joining the room and resetting URLs.
After define the participant and room name, the user can click the Join button to connect to the room. This action triggers the connectToRoom method asynchronously:
| ConnectView.swift | |
|---|---|
| |
- The
getTokenmethod is called to request a token from the application server. - The
connectmethod is called to connect to the room using the LiveKit URL and the token. - The
enableCameraAndMicrophonemethod is called to enable the camera and microphone for the local participant. - The
setCameramethod is called to enable the camera for the local participant. - The
setMicrophonemethod is called to enable the microphone for the local participant.
The OpenViduApp.swift handle the navigation page. When room status is connected, the user is redirected to the RoomView:
struct RoomSwitchView: View {
    @EnvironmentObject var appCtx: AppContext
    @EnvironmentObject var roomCtx: RoomContext
    @EnvironmentObject var room: Room

    var shouldShowRoomView: Bool {
        room.connectionState == .connected || room.connectionState == .reconnecting
    }

    var shouldShowConfigureUrlsView: Bool {
        appCtx.applicationServerUrl.isEmpty || roomCtx.livekitUrl.isEmpty

    }

    var body: some View {
        ZStack {
            Color.black
                .ignoresSafeArea()

            // Navigation logic
            if shouldShowRoomView {
                RoomView() // (1)!
            } else {
                if shouldShowConfigureUrlsView {
                    ConfigureUrlsView() // (2)!
                } else {
                    ConnectView() // (3)!
                }
            }
        }
        .navigationTitle(computeTitle())
    }
}
- If the room is connected, the user is redirected to the
RoomView. - If the URLs are not configured, the user is redirected to the
ConfigureUrlsView. - If the room is not connected and the URLs are configured, the user is redirected to the
ConnectView.
Displaying Video Tracks#
To display the video tracks of participants in the room, the RoomView.swift uses various SwiftUI views and custom components. This approach allows the application to dynamically load and display the video tracks as they are received.
struct RoomView: View {
    @EnvironmentObject var appCtx: AppContext
    @EnvironmentObject var roomCtx: RoomContext
    @EnvironmentObject var room: Room

    @State var isCameraPublishingBusy = false
    @State var isMicrophonePublishingBusy = false

    // ...

    func content(geometry: GeometryProxy) -> some View {
        VStack {
            // ...

            // Display Participant layout
            HorVStack(axis: geometry.isTall ? .vertical : .horizontal, spacing: 5) {
                Group {
                    ParticipantLayout(sortedParticipants(), spacing: 5) { participant in // (1)!
                        ParticipantView(participant: participant, videoViewMode: .fill) // (2)!
                    }
                }
                .frame(
                    minWidth: 0,
                    maxWidth: .infinity,
                    minHeight: 0,
                    maxHeight: .infinity
                )
            }
            .padding(5)
        }
    }
}
- The
ParticipantLayoutcomponent is used to display the video tracks of all participants in the room. It receives the sorted list of participants and a closure that returns aParticipantViewfor each participant. - The
ParticipantViewcomponent is used to display the video track of a participant.
The ParticipantView component is responsible for rendering the video track of a participant. It uses the SwiftUIVideoView component to display the video track and the VideoView.LayoutMode enum to define the layout mode.
The LiveKit Swift SDK includes a VideoView class, based on UIKit, specifically designed for rendering video tracks. Additionally, subscribed audio tracks are automatically played by default.
struct ParticipantView: View {
    @ObservedObject var participant: Participant
    @EnvironmentObject var appCtx: AppContext

    var videoViewMode: VideoView.LayoutMode = .fill


    // ...

     var body: some View {
        GeometryReader { geometry in
            ZStack(alignment: .bottom) {

                // ...

                // VideoView for the Participant
                if let publication = participant.mainVideoPublication,
                    !publication.isMuted,
                    let track = publication.track as? VideoTrack
                {
                    ZStack(alignment: .topLeading) {
                        SwiftUIVideoView(track, // (1)!
                                            layoutMode: videoViewMode,
                                            isRendering: $isRendering)
                    }
                }
            }
        }
     }

}
- The
SwiftUIVideoViewcomponent renders the participant's video track.
Leaving the room#
To leave the room, the user can click the Leave button in the RoomView. This action triggers the leaveRoom method asynchronously:
| RoomView.swift | |
|---|---|
| |
After rome is disconnected, the room status is updated to disconnected and the OpenViduApp.swift handle this update to redirect the user to the ConnectView.