Basic Recording Tutorial S3#
This tutorial is a simple video-call application, built upon Node.js server and JavaScript client tutorials, and extends them by adding recording capabilities:
- Start and stop recording a room.
- List all recordings in a room.
- Play a recording.
- Delete a recording.
- List all available recordings.
Recordings are always persisted in some kind of storage system. This type of storage depends on your OpenVidu deployment:
- When running OpenVidu locally or On-Premises, recordings are stored in a local S3 Minio bucket.
- When running OpenVidu in AWS, recordings are stored in an AWS S3 bucket.
- When running OpenVidu in Azure, recordings are stored in an Azure Blob Storage container. If this is your case, follow the Recording Basic Azure tutorial instead.
Running this tutorial#
1. Run OpenVidu Server#
-
Download OpenVidu
-
Configure the local deployment
-
Run OpenVidu
-
Deploy OpenVidu Single Node in AWS following these instructions to deploy in AWS.
CPUs to be able to record
Make sure you deploy with at least 4 CPUs in the Virtual Machine of AWS.
-
Point the tutorial to your AWS deployment:
- Modify file
.envto update the LiveKit and AWS configuration to the values of your AWS deployment. You can get the values ofLIVEKIT_URL,LIVEKIT_API_KEYandLIVEKIT_API_SECRETfrom the Configure your application to use the deployment section. You can get the values ofS3_ENDPOINT,AWS_REGIONandS3_BUCKETfrom theopenvidu.envfile of your deployment by making ssh to the instance. For theS3_ACCESS_KEYandS3_SECRET_KEYyou will need to create an access key in the IAM section of AWS to be able to use them in the tutorial (check Manage access keys for IAM users). - Modify file
app.jsto update the value ofLIVEKIT_URLwith yourLIVEKIT_URL.
- Modify file
Warning
If you are using self-signed certificate you will need to add this line in the first line after the imports on the index.js process.env.NODE_TLS_REJECT_UNAUTHORIZED = "0"; // Disable TLS verification for local testing
Configure Webhooks
All application servers have an endpoint to receive webhooks from OpenVidu. For this reason, when using a production deployment you need to configure webhooks to point to your local application server in order to make it work. Check the Send Webhooks to a Local Application Server section for more information.
2. Download the tutorial code#
3. Run the application#
To run this application, you need Node.js (≥ 18) installed on your device.
- Navigate into the application directory
- Install dependencies
- Run the application
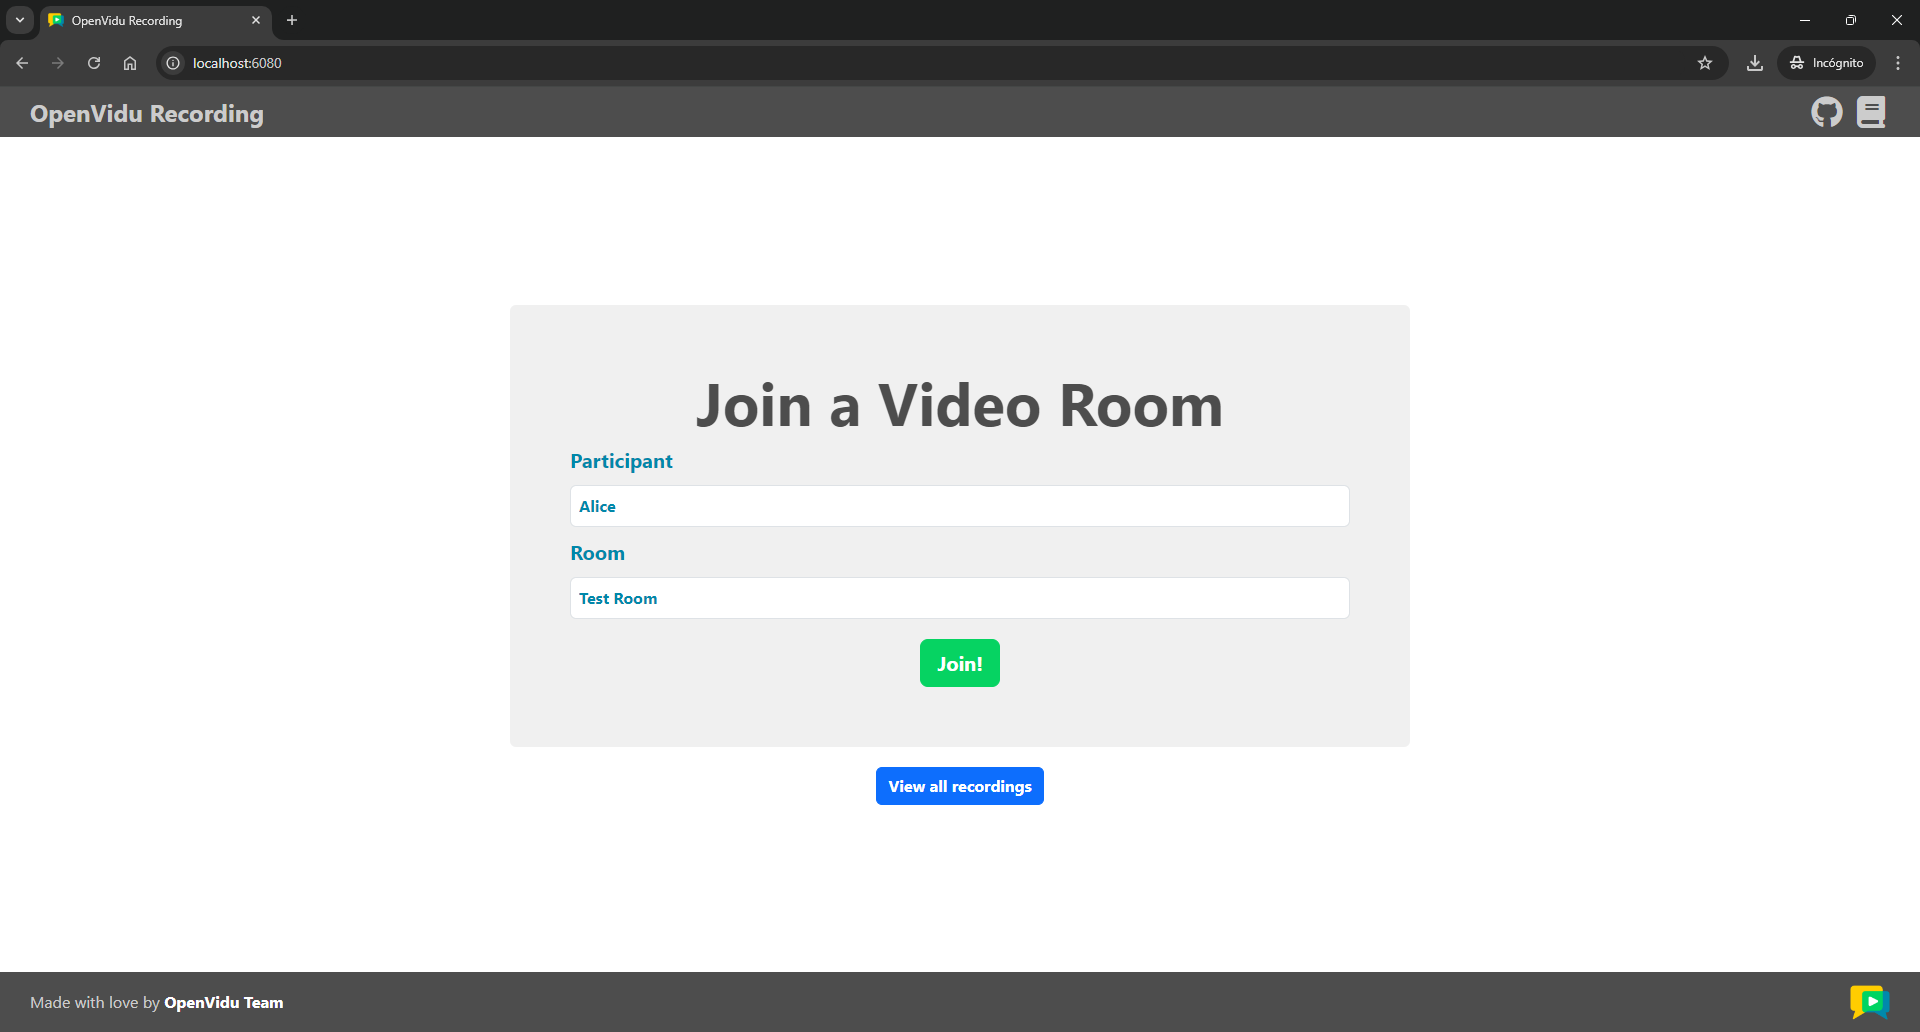
Once the server is up and running, you can test the application by visiting http://localhost:6080. You should see a screen like this:
Accessing your application from other devices in your local network
One advantage of running OpenVidu locally is that you can test your application with other devices in your local network very easily without worrying about SSL certificates.
Access your application client through https://xxx-yyy-zzz-www.openvidu-local.dev:6443, where xxx-yyy-zzz-www part of the domain is your LAN private IP address with dashes (-) instead of dots (.). For more information, see section Accessing your local deployment from other devices on your network.
Understanding the code#
This application consists of two essential backend files under the src directory:
index.js: This file holds the server application and defines the REST API endpoints.s3.service.js: This file encapsulates the operations to interact with the S3 bucket.
And the following essential frontend files under the public directory:
index.html: This is the client application's main HTML file.app.js: This is the main JavaScript file that interacts with the server application and handles the client application's logic and functionality.style.css: This file contains the client application's styling.recordings.html: This file defines the HTML for the general recording page.
Backend#
The server application extends the Node.js server tutorial by adding the following REST API endpoints:
POST /recordings/start: Starts the recording of a room.POST /recordings/stop: Stops the recording of a room.GET /recordings: Lists all recordings stored in the S3 bucket. This endpoint also allows filtering recordings by room ID.GET /recordings/:recordingName: Retrieves a recording from the S3 bucket and returns it as a stream.DELETE /recordings/:recordingName: This endpoint deletes a recording from the S3 bucket.
Before we dive into the code of each endpoint, let's first see the changes introduced in the index.js file:
- The URL of the LiveKit server.
- The path where recordings will be stored in the S3 bucket.
- The portion size of the recording that will be sent to the client in each request. This value is set to
5 MB. - Set the
publicdirectory as the static files location.
There are three new environment variables:
LIVEKIT_URL: The URL of the LiveKit server.RECORDINGS_PATH: The path where recordings will be stored in the S3 bucket.RECORDING_FILE_PORTION_SIZE: The portion size of the recording that will be sent to the client in each request.
Besides, the index.js file configures the server to serve static files from the public directory.
It also initializes the EgressClient, which will help interacting with Egress API to manage recordings, and the S3Service, which will help interacting with the S3 bucket:
| <a href='https://github.com/OpenVidu/openvidu-livekit-tutorials/blob/master/advanced-features/openvidu-recording-basic-node/src/index.js#L34-L39' target='_blank'>index.js</a> | |
|---|---|
The POST /token endpoint has been modified to add the roomRecord permission to the access token, so that participants can start recording a room:
- Add the
roomRecordpermission to the access token.
Now let's explore the code for each recording feature:
Start recording#
The POST /recordings/start endpoint starts the recording of a room. It receives the name of the room to record as parameter and returns the recording metadata:
- The
getActiveRecordingByRoomfunction retrieves the active recording for a room. - If there is already an active recording for the room, the server returns a
409 Conflictstatus code. - Use the
EncodedFileOutputclass to export the recording to an external file. - Define the file type as
MP4. - Define the file path where the recording will be stored. The
{room_name},{time}and{room_id}templates will be replaced by the actual room name, timestamp and room ID, respectively. Check out all available filename templates . - Start a
RoomCompositeEgressto record all participants in the room by calling thestartRoomCompositeEgressmethod of theEgressClientwith theroomNameandfileOutputas parameters. - Extract the recording name from the
fileResultsarray. - Return the recording metadata to the client.
This endpoint does the following:
- Obtains the
roomNameparameter from the request body. If it is not available, it returns a400error. -
Check if there is already an active recording for the room. If there is, it returns a
409error to prevent starting a new recording. To accomplish this, we use thegetActiveRecordingByRoomfunction, which lists all active egresses for a specified room by calling thelistEgressmethod of theEgressClientwith theroomNameandactiveparameters, and then returns the egress ID of the first active egress found: -
Initializes an
EncodedFileOutputobject to export the recording to an external file. It sets the file type asMP4and defines the file path where the recording will be stored. The{room_name},{time}and{room_id}templates will be replaced by the actual room name, timestamp and room ID, respectively. Check out all available filename templates . - Starts a
RoomCompositeEgressto record all participants in the room by calling thestartRoomCompositeEgressmethod of theEgressClientwithroomNameandfileOutputas parameters. - Extracts the recording name from the
fileResultsarray. - Returns the recording metadata to the client.
Stop recording#
The POST /recordings/stop endpoint stops the recording of a room. It receives the room name of the room to stop recording as a parameter and returns the updated recording metadata:
- The
getActiveRecordingByRoomfunction retrieves the active recording for a room. - If there is no active recording for the room, the server returns a
409 Conflictstatus code. - Stop the egress to finish the recording by calling the
stopEgressmethod of theEgressClientwith the egress ID (activeRecording) as a parameter. - Return the updated recording metadata to the client.
This endpoint does the following:
- Obtains the
roomNameparameter from the request body. If it is not available, it returns a400error. - Retrieves all active egresses for the room. If there is no active egress for the room, it returns a
409error to prevent stopping a non-existent recording. - Extracts the
egressIdfrom the active egress. - Stops the egress to finish the recording by calling the
stopEgressmethod of theEgressClientwith the egress ID (activeRecording) as a parameter. - Returns the updated recording metadata to the client.
List recordings#
The GET /recordings endpoint lists all recordings stored in the S3 bucket. This endpoint also allows filtering recordings by room name or room ID:
- Obtain the
roomIdquery parameter for later filtering, if available. - List all Egress video files in the S3 bucket.
- Map all of the recording names from the S3 response.
- Filter the recordings by room ID, if available.
- Return the list of recordings to the client.
This endpoint does the following:
- Obtains the
roomIdquery parameter for later filtering, if available. - Lists all Egress video files in the S3 bucket. To accomplish this, we use the
listObjectsmethod of theS3Servicewith theRECORDINGS_PATHparameter. - Extracts the recording names from the S3 response.
- Filters the recordings by room ID, if available. The room ID is part of the recording name, so we can filter with a quick check.
- Returns the list of recordings to the client.
Get recording#
The GET /recordings/:recordingName endpoint retrieves a specific portion of a recording from the S3 bucket and returns it as a stream. The server sends the recording file in portions of 5 MB each time the client requests a range of the recording file. This is done to prevent loading the entire recording file into memory and to allow the client to play the recording while it is being downloaded and seek to a specific time:
- Check if the recording exists in the S3 bucket.
- Get the recording file from the S3 bucket.
- Set the response status code to
206 Partial Content. - Set the
Cache-Controlheader asno-cache. - Set the
Content-Typeheader asvideo/mp4. - Set the
Accept-Rangesheader asbytes. - Set the
Content-Rangeheader with the start and end of the recording file and its size. - Set the
Content-Lengthheader as the size of the recording file portion. - Pipe the recording file to the response.
This endpoint does the following:
- Extracts the
recordingNameparameter from the request. - Checks if the recording exists in the S3 bucket by calling the
existsmethod of theS3Servicewith thekeyas a parameter. If the recording does not exist, it returns a404error. -
Gets the requested range of the recording file by calling the
getRecordingStreamfunction:- Get the size of the recording file.
- Get the start of the requested range.
- Get the end of the requested range or set it to the start plus the established portion size.
- Get the minimum between the end of the requested range and the size of the recording file minus one.
- Get the recording file from the S3 bucket with the requested range.
This function does the following:
- Gets the size of the recording file by calling the
getObjectSizemethod of theS3Servicewith thekeyas a parameter. - Extracts the start of the requested range from the
rangeheader. - Extracts the end of the requested range from the
rangeheader. If the end is not provided, it sets the end to the start plus the established portion size. - Gets the minimum between the end of the requested range and the size of the recording file minus one. This is done to prevent requesting a range that exceeds the recording file size.
- Gets the recording file from the S3 bucket with the requested range by calling the
getObjectmethod of theS3Servicewith thekeyandrangeas parameters.
-
Sets the response headers:
Cache-Control:no-cache.Content-Type:video/mp4.Accept-Ranges:bytes.Content-Range: The start and end of the recording file and its size.Content-Length: The size of the recording file portion.
-
Pipes the recording file to the response.
Direct access to S3 bucket
With this approach, the backend acts as a proxy between the client and S3, which may result in increased server resource usage. To avoid this, it is more efficient to provide the client with a presigned URL, allowing direct access to the recording files from the S3 bucket. In the advanced recording tutorial, we show how to implement this method, along with a discussion of its advantages and disadvantages.
Delete recording#
The DELETE /recordings/:recordingName endpoint deletes a recording from the S3 bucket:
- Check if the recording exists in the S3 bucket.
- Delete the recording file from the S3 bucket.
This endpoint does the following:
- Extracts the
recordingNameparameter from the request. - Checks if the recording exists in the S3 bucket by calling the
existsmethod of theS3Servicewith thekeyas a parameter. If the recording does not exist, it returns a404error. - Deletes the recording file from the S3 bucket by calling the
deleteObjectmethod of theS3Servicewith the object'skeyas a parameter.
S3 service#
Finally, let's take a look at the s3.service.js file, which encapsulates the operations to interact with the S3 bucket:
- The URL of the S3 server.
- The access key of the S3 server.
- The secret key of the S3 server.
- The AWS region of the S3 server.
- The name of the S3 bucket.
- Initialize the
S3Clientwith the provided configuration. - Check if an object exists in the S3 bucket.
- Retrieve the metadata of an object in the S3 bucket.
- Retrieve the size of an object in the S3 bucket.
- Retrieve a specified range of bytes from an object in the S3 bucket.
- List objects in the S3 bucket that match a regex pattern.
- Delete an object from the S3 bucket.
- Execute an S3 command.
This file loads environment variables for the S3 configuration:
S3_ENDPOINT: The URL of the S3 server.S3_ACCESS_KEY: The access key of the S3 server.S3_SECRET_KEY: The secret key of the S3 server.AWS_REGION: The AWS region of the S3 server.S3_BUCKET: The name of the S3 bucket.
Then, it defines the S3Service class as a singleton, which initializes the S3Client with the provided configuration. The class encapsulates the following methods to interact with the S3 bucket:
exists: Checks if an object exists in the S3 bucket.headObject: Retrieves the metadata of an object in the S3 bucket.getObjectSize: Retrieves the size of an object in the S3 bucket.getObject: Retrieves an object from the S3 bucket.listObjects: Lists objects in the S3 bucket that match a regex pattern.deleteObject: Deletes an object from the S3 bucket.run: Executes an S3 command.
Frontend#
The client application extends the JavaScript client tutorial by adding recording features, introducing new buttons to facilitate actions such as starting and stopping recording a room, as well as listing, playing and deleting recordings. When these newly introduced buttons are interacted with, the client triggers requests to the REST API endpoints of the server application.
In order to update the user interface of all participants in the room according to the recording status, the client application subscribes to the RoomEvent.RecordingStatusChanged event, which is triggered when the room changes from being recorded to not being recorded, and vice versa. When this event is triggered, the updateRecordingInfo function is called to update the recording information of the room displayed on the screen. This function is also called when a participant joins the room, using the current value of the room.recording property at that moment. This is done in the joinRoom function of the app.js file:
Limitations of the RoomEvent.RecordingStatusChanged event
By using the RoomEvent.RecordingStatusChanged event, we can only detect when the recording has started or stopped, but not other states like starting, stopping or failed. Additionally, when the recording stops, the event is not triggered until the recorder participant leaves the room, causing a delay of 20 seconds approximately between the stop and when participants are notified.
To overcome these limitations, you can follow the steps described in the advanced recording tutorial, where we implement a custom notification system. This system informs participants about the recording status by listening to webhook events and updating room metadata.
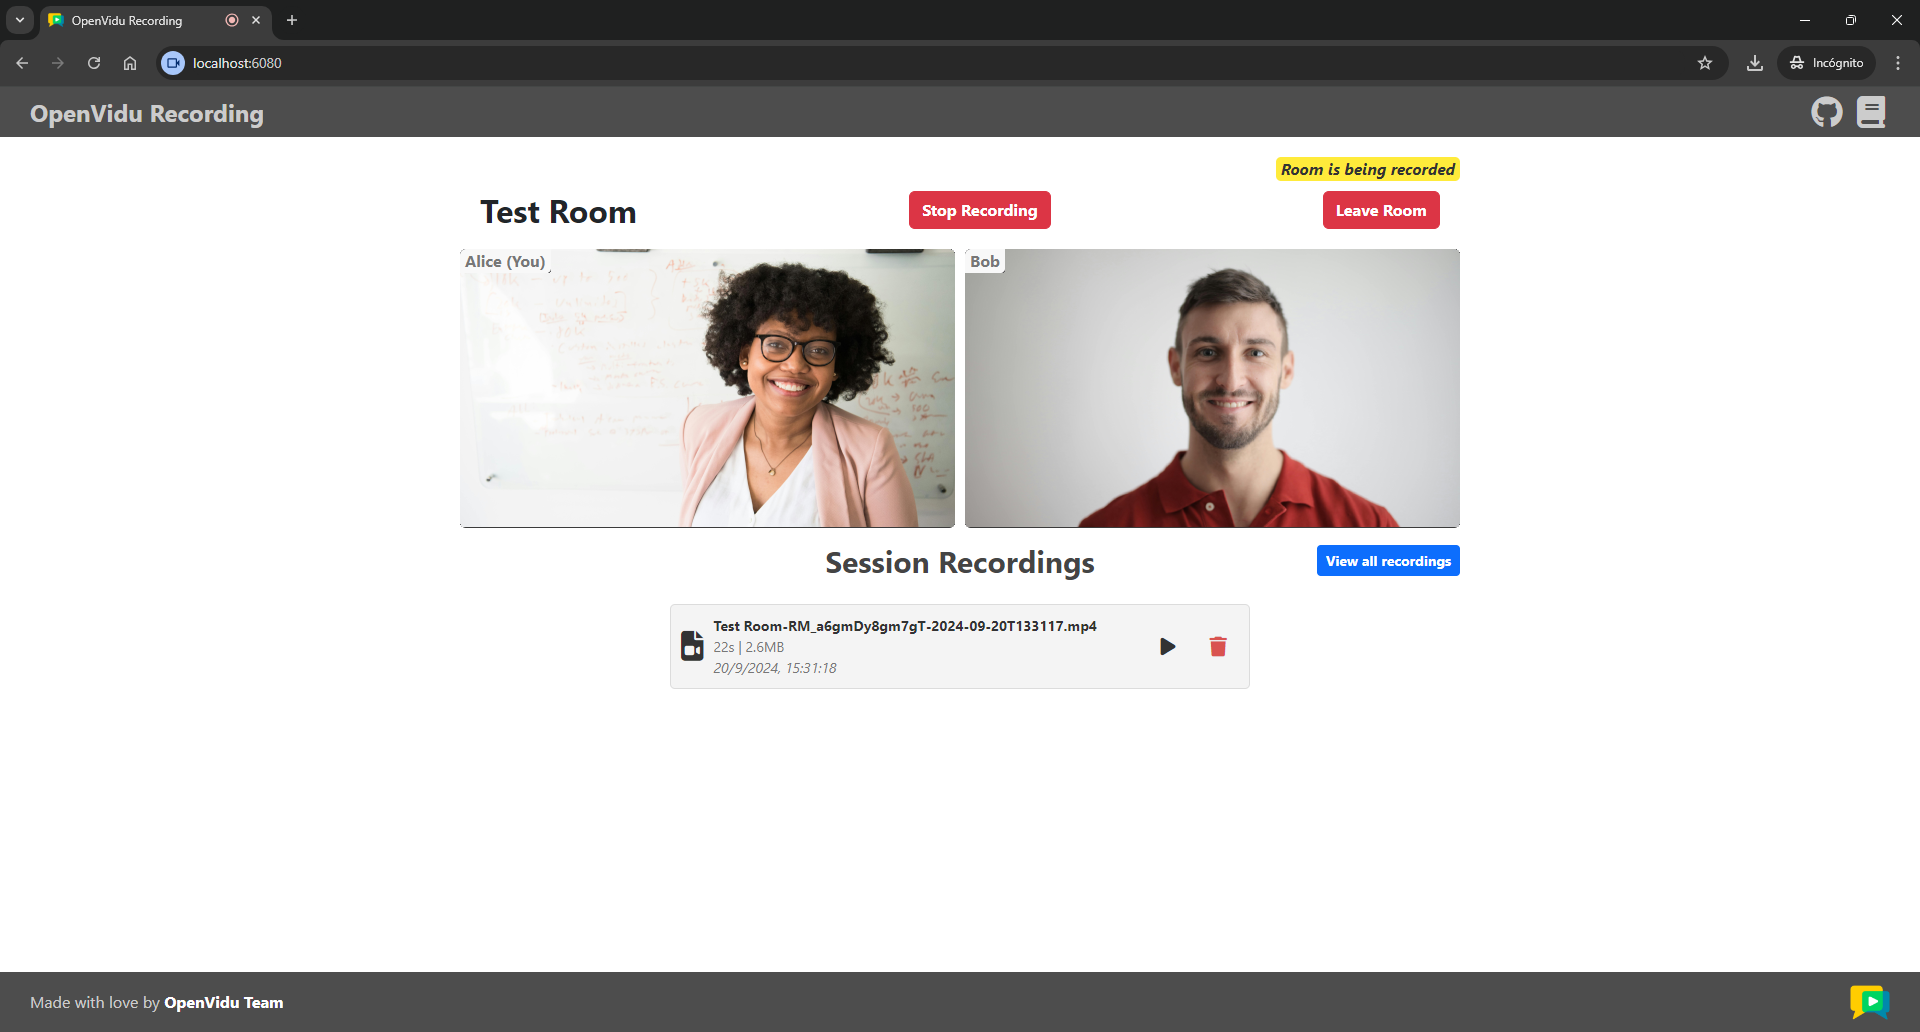
The updateRecordingInfo function updates the recording information of the room by changing the recording button's text and color according to the recording status. It also shows or hides the alert message that informs the user that the room is being recorded. Finally, it updates the recording list by calling the listRecordings function.
This function retrieves all recordings available for the room from the backend and displays their relevant information by invoking the showRecordingList function:
The showRecordingList function creates a new div element for each recording available in the room and appends it to the recording-list container. Each div element contains the recording name, as well as buttons to play and delete the recording.
Recording deletion
When a recording is deleted, it is removed from the recording list, but only for the user who initiated the deletion. Other users will continue to see the recording in their list until it is refreshed.
In the advanced recording tutorial, we show how to implement a custom notification system that alerts all participants of a recording's deletion by sending data messages.
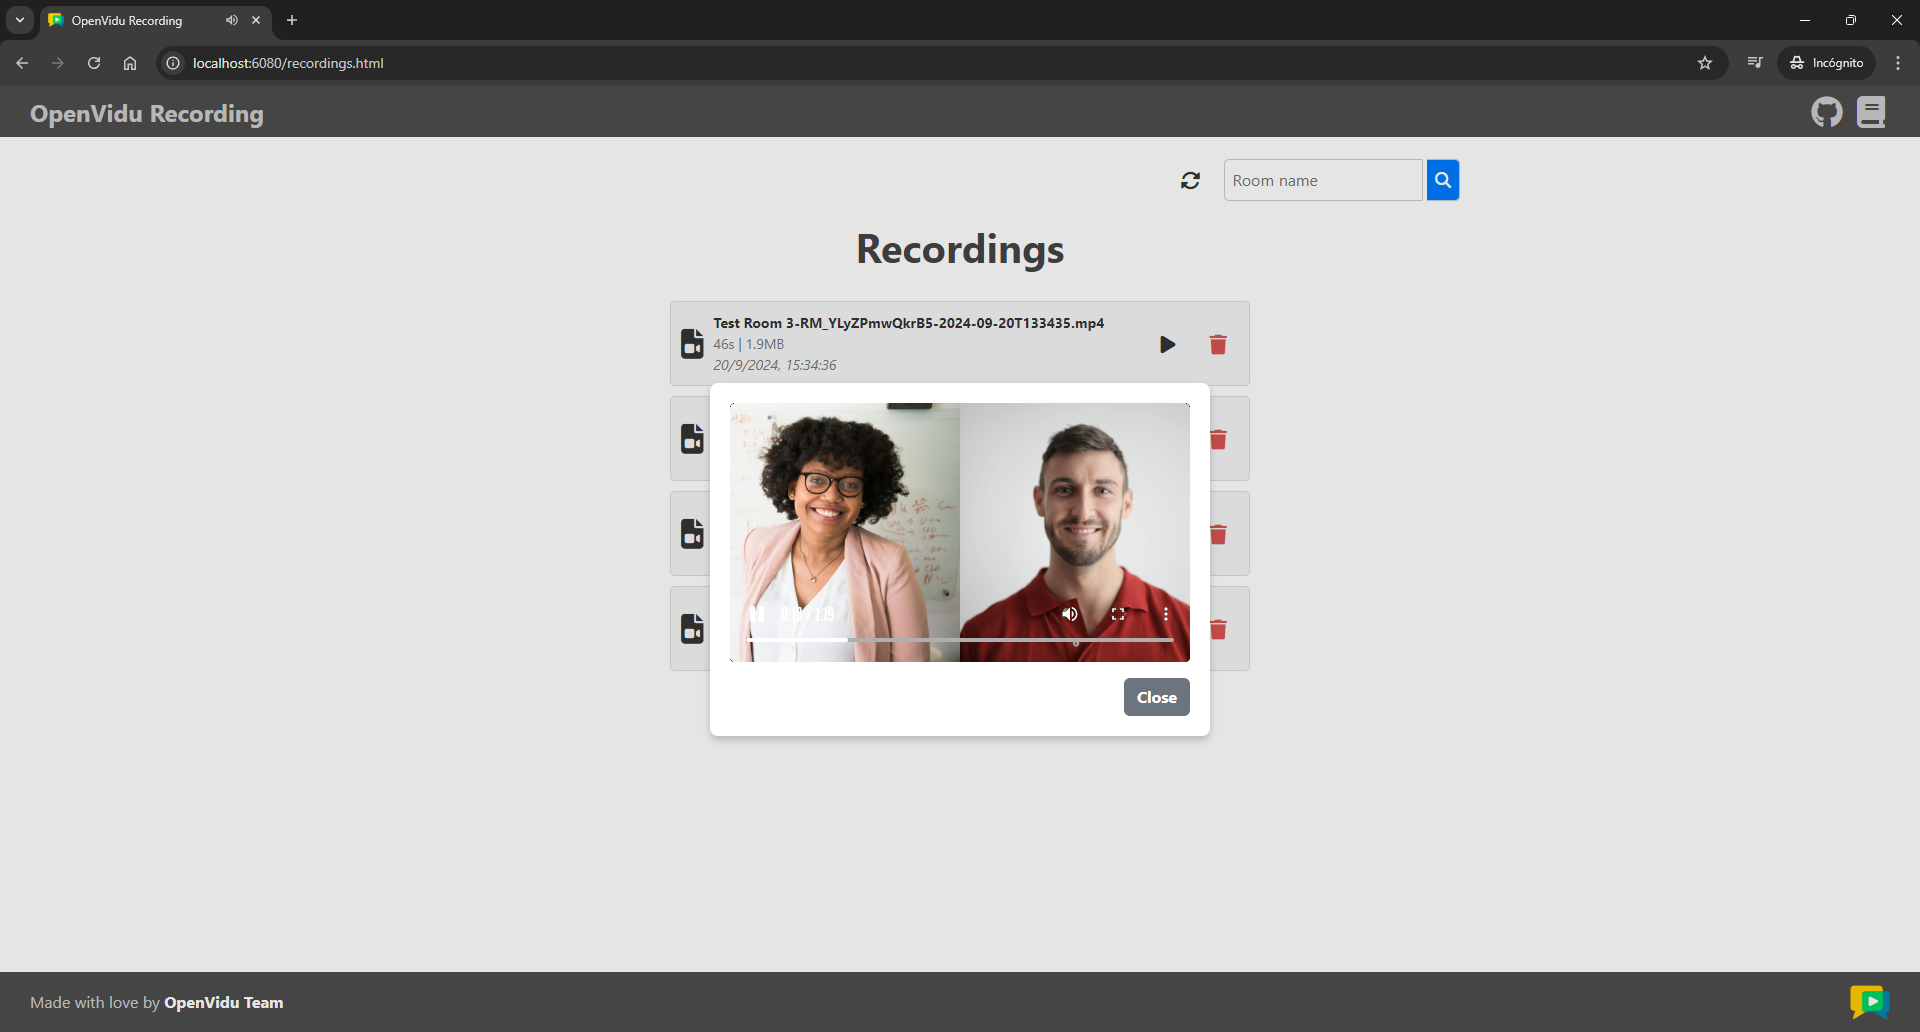
When the user clicks the play button, the displayRecording function is called to play the recording. This function opens a dialog window with an embedded video element and sets the source of the video to the get recording endpoint of the server application:
| <a href='https://github.com/OpenVidu/openvidu-livekit-tutorials/blob/master/advanced-features/openvidu-recording-basic-node/public/app.js#L372-L379' target='_blank'>app.js</a> | |
|---|---|
| <a href='https://github.com/OpenVidu/openvidu-livekit-tutorials/blob/master/advanced-features/openvidu-recording-basic-node/public/index.html#L94-L99' target='_blank'>index.html</a> | |
|---|---|
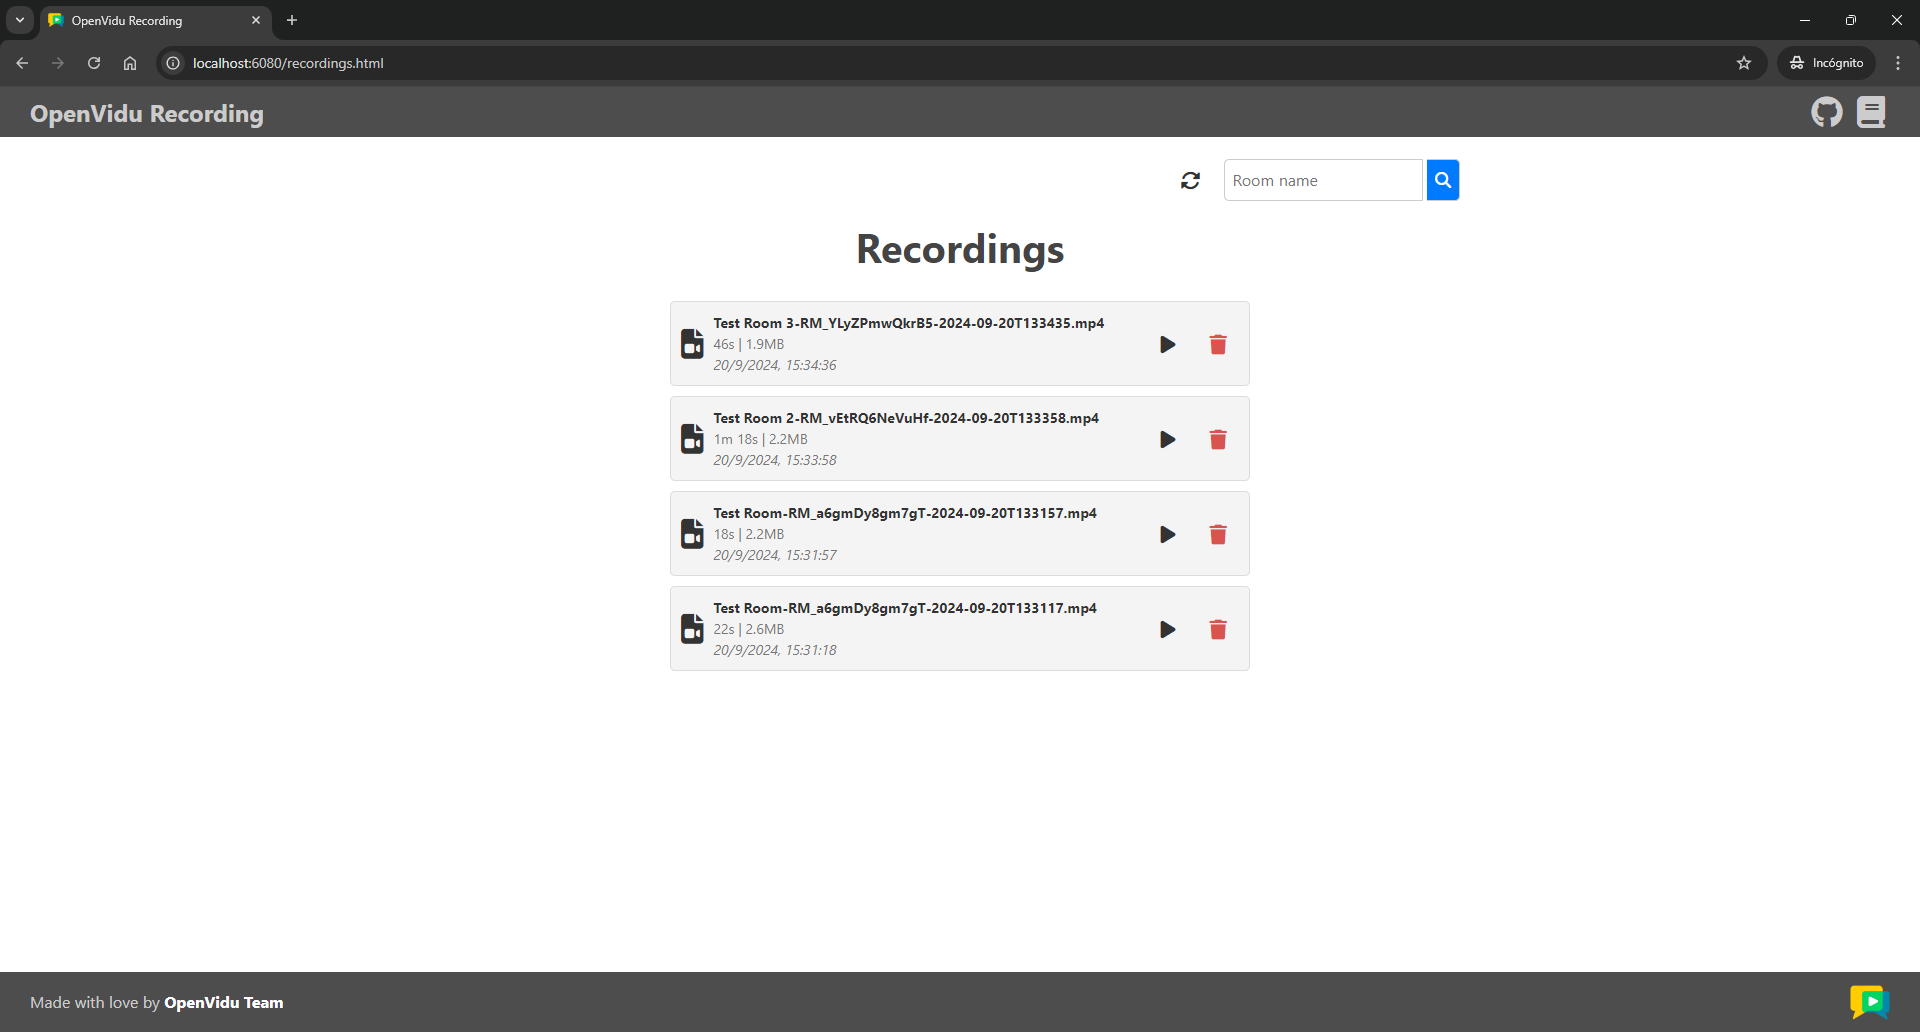
General recording page#
The recordings.html file defines the HTML for the general recording page. This page lists all available recordings from all rooms and allows the user to filter them by room name. It also provides buttons to play and delete each recording.