OpenVidu High Availability installation: DigitalOcean#
DigitalOcean
Info
OpenVidu High Availability is part of OpenVidu PRO. Before deploying, you need to create an OpenVidu account to get your license key. There's a 15-day free trial waiting for you!
This section describes how to deploy a production-ready OpenVidu High Availability setup on DigitalOcean. The deployed services are equivalent to those in the On Premises High Availability installation, but provisioned as DigitalOcean resources and automated using Terraform CLI.
- DigitalOcean Spaces Object Storage (S3-compatible) is used for storing application data, recordings, and cluster data.
- Media Node scalability is not supported in this deployment. The number of Media Nodes is fixed and must be defined before deployment.
Prerequisites#
- You need to have a DigitalOcean account with a Personal Access Token .
- You need to have installed Terraform CLI .
- You need to have installed Git.
This is what the deployment architecture looks like:

- The Load Balancer distributes HTTPS traffic to the Master Nodes.
- If RTMP media is ingested, the Load Balancer also routes this traffic to the Master Nodes that they act as a bridge.
- WebRTC traffic (SRTP/SCTP/STUN/TURN) is routed directly to the Media Nodes.
- 4 fixed Droplets are created for the Master Nodes. It must always be 4 Master Nodes to ensure high availability.
Custom scale-in strategy#
Currently DigitalOcean does not support autoscaling. OpenVidu Elastic and OpenVidu High Availability Autoscale Pool of Media Nodes is fixed in number.
Info
Autoscaling of Media Nodes in DigitalOcean is a work in progress and will be available in a future release.
Deployment details#
- Clone the OpenVidu repository with the terraform files:
-
Copy terraform.tfvars.example to terraform.tfvars, update the required parameters with your values, and optionally adjust defaults.
Information about parameters
Mandatory Parameters
Input Value Description doTokenDigitalOcean Personal Access Token for API authentication. stackNameStack name for OpenVidu deployment. openviduLicenseOpenVidu License for PRO deployments. Go here for more information. Optional Parameters
Input Value Default Value Description region"ams3"DigitalOcean region where resources will be created. masterNodesInstanceType"s-4vcpu-8gb"Specifies the DigitalOcean Droplet size for your Master Node. mediaNodeInstanceType"s-4vcpu-8gb"Specifies the DigitalOcean Droplet size for your Media Nodes. fixedNumberOfMediaNodes4Fixed number of Media Nodes. rtcEngine"pion"Media Engine. Available options: pion,mediasoup.certificateType"letsencrypt"Certificate type for OpenVidu deployment. Options: selfsigned- Not recommended for production use. Just for testing purposes or development environments. You don't need a FQDN to use this option.owncert- Valid for production environments. Use your own certificate. You need a FQDN to use this option.letsencrypt- Valid for production environments. Can be used with or without a FQDN (if no FQDN is provided, a random sslip.io domain will be used).
Warning: sslip.io is currently experiencing Let's Encrypt rate limiting issues, which may prevent SSL certificates from being generated. It is recommended to use your own domain name. Check this community thread for troubleshooting and updates.
domainName(none)Domain name for the OpenVidu Deployment. Not mandatory; if not provided, a sslip.io domain will be used instead. ownPublicCertificate(none)If certificate type is 'owncert', this parameter will be used to specify your public certificate in base64. ownPrivateCertificate(none)If certificate type is 'owncert', this parameter will be used to specify your private certificate in base64. initialMeetAdminPassword(none)Initial password for the 'admin' user in OpenVidu Meet. If not provided, a random password will be generated. initialMeetApiKey(none)Initial API key for OpenVidu Meet. If not provided, no API key will be set and the user can set it later from Meet Console. volumeSize100Size of the additional volume in GB for Master Node. spaceAppDataName(none)Name of the DigitalOcean Space (S3-compatible bucket) to store application data and recordings. If empty, a bucket will be created with default name. spaceClusterDataName(none)Name of the DigitalOcean Space (S3-compatible bucket) to store cluster data. If empty, a bucket will be created with default name. spaceRegion"ams3"DigitalOcean Spaces region where the bucket will be created. spacesAccessId(none)Access key ID for DigitalOcean Spaces (S3-compatible). Required if spaceName is provided. spacesSecretKey(none)Secret access key for DigitalOcean Spaces (S3-compatible). Required if spaceName is provided. additionalInstallFlags(none)Additional optional flags to pass to the OpenVidu installer (comma-separated, e.g., '--flag1=value, --flag2'). Currently we only have one flag that is `--force-utc-timezone` to force UTC as the timezone for OpenVidu. By default, OpenVidu uses the timezone configured in the host machine where it is installed. Note that in general it is recommended to use UTC, and DigitalOcean Droplets already default to UTC, so this flag is not usually necessary. Warning
In DigitalOcean, you need Space Access Keys to create a bucket. If you leave the spaceAppDataName or spaceClusterDataName variable empty, you must configure these keys with full access so a new bucket can be created. Here is how .
-
Use the following commands to deploy with terraform.
-
You will see logs appear in the terraform apply execution console. Wait for it to finish and display
Apply Complete!. Now go to Space Object Storage and wait for the ssh key to appear in the bucket you have configured.Warning
After downloading the SSH key, it is highly recommended to DELETE IT from the bucket. This file is the private key used to access the droplet. If exposed, unauthorized users could gain access to the instance.

-
Give the SSH Key the necessary permissions for it to work.
Access OpenVidu#
To verify that your OpenVidu deployment works correctly wait for the secrets.env to appear in the bucket that you've configured and open it to view the credentials of OpenVidu.
- Go to the Space Object Storage bucket that you've configurated and download the
secrets.envfile.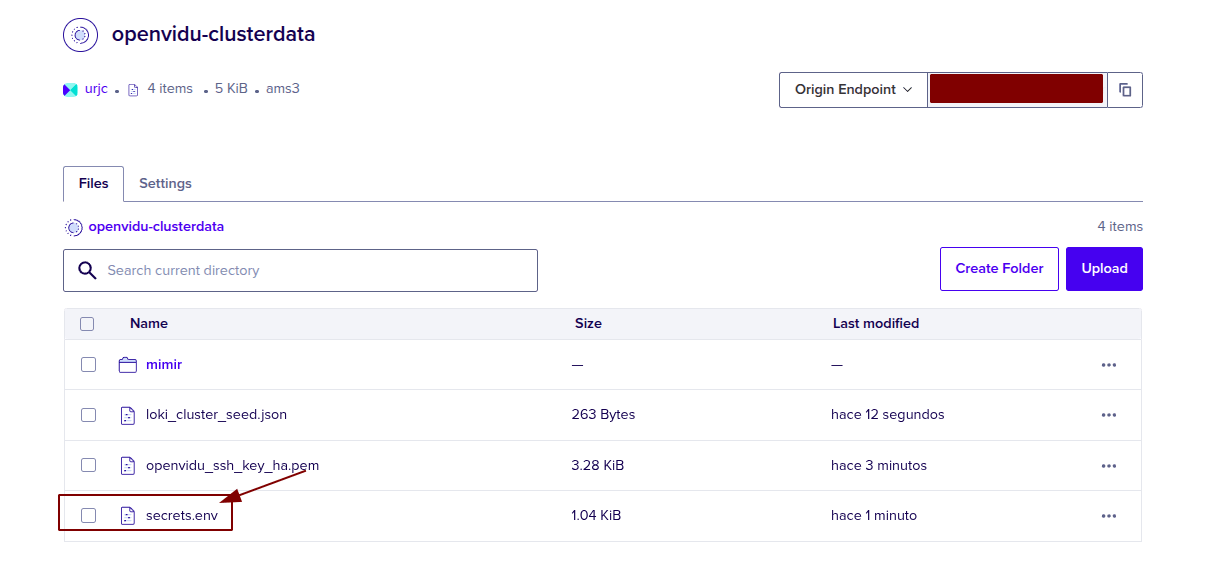
Then open OPENVIDU_URL and you will see the OpenVidu Meet interface. Log in with MEET_INITIAL_ADMIN_PASSWORD and you will be able to enjoy the features of OpenVidu Meet.
Configure your application to use the deployment#
You may need your Digital Ocean credentials to configure your OpenVidu application. You can check these secrets following these steps (View OpenVidu credentials in the Web) or (View OpenVidu credentials in the instance).
Your authentication credentials and the URL to point your applications to are:
OpenVidu Meet:
OPENVIDU_URL: The URL to access OpenVidu Meet, which is alwayshttps://yourdomain.example.io/MEET_INITIAL_ADMIN_USER: User to access OpenVidu Meet Console. It is alwaysadmin.MEET_INITIAL_ADMIN_PASSWORD: Password to access OpenVidu Meet Console.MEET_INITIAL_API_KEY: API key to use OpenVidu Meet Embedded and OpenVidu Meet REST API.
Note
The MEET_INITIAL_ADMIN_USER, MEET_INITIAL_ADMIN_PASSWORD, and MEET_INITIAL_API_KEY values are initial settings that changing them will not affect to the deployment. They can only be changed from the Meet Console.
OpenVidu Platform:
LIVEKIT_URL: The URL to use LiveKit SDKs, which can bewss://yourdomain.example.io/orhttps://yourdomain.example.io/depending on the client library you are using.LIVEKIT_API_KEY: API Key for LiveKit SDKs.LIVEKIT_API_SECRET: API Secret for LiveKit SDKs.
OpenVidu V2 Compatibility Credentials
This section is only needed if you want to use OpenVidu v2 compatibility.
- URL: The URL to access OpenVidu, which is the value of
OPENVIDU_URL(e.g.,https://yourdomain.example.io/) - Username: Basic auth user for OpenVidu v2 compatibility. It is always
OPENVIDUAPP. - Password: Basic auth password for OpenVidu v2 compatibility is the same as
LIVEKIT_API_SECRET.
Troubleshooting initial DigitalOcean deployment creation#
If something goes wrong during the initial DigitalOcean deployment creation, you won't be able to reach the OPENVIDU_URL. It could be due to a misconfiguration in the parameters, a lack of permissions, or a problem with services. When this happens, the following steps can help you troubleshoot the issue and identify what went wrong:
- Check whether the instance or instances are running. If they are not, check whether the
terraform applycommand logged an error. -
If the instance or instances are running, SSH into the instance and check the logs by running this command:
These logs will give you more information about the DigitalOcean deployment creation process.
-
If everything seems fine, check the status and the logs of the installed OpenVidu services.
Configuration and administration#
When your OPENVIDU_URL is reachable, it means that everything has gone well. Now you can check the Administration section to learn how to manage your deployment.