OpenVidu Elastic installation: Azure#
Warning
Azure deployments are considered in Beta in version 3.2.0 of OpenVidu.
Info
OpenVidu Elastic is part of OpenVidu PRO. Before deploying, you need to create an OpenVidu account to get your license key. There's a 15-day free trial waiting for you!
This section contains the instructions to deploy a production-ready OpenVidu Elastic deployment in Azure. Deployed services are the same as the On Premises Elastic installation but they will be resources in Azure and you can automate the process with the Template Spec of ARM.
To import the template into Azure you just need to click the button below and you will be redirected to azure.
This is how the architecture of the deployment looks like:

- The Master Node acts as a Load Balancer, managing the traffic and distributing it among the Media Nodes and deployed services in the Master Node.
- The Master Node has its own Caddy server acting as a Layer 4 (for TURN with TLS and RTMPS) and Layer 7 (for OpenVidu Dashboard, OpenVidu Call, etc., APIs) reverse proxy.
- WebRTC traffic (SRTP/SCTP/STUN/TURN) is routed directly to the Media Nodes.
- A Scaling Set of Media Nodes is created to scale the number of Media Nodes based on the system load.
We use a custom scale-in strategy to allow the graceful shutdown of Media Nodes. In this way we ensure no disruption of active Rooms when the cluster tries to remove a Media Node.
- All instances in the Media Node scale set are protected to prevent their automatic shutdown.
- We receive and use the shutdown event to execute acustom Automation runbook.
- The Automation runbook determines the instance that has to be terminated and executes the appropriate commands in all internal services to prevent them of accepting new jobs (new Rooms, new Egresses, new Ingresses, new Agents...).
- Only when all the jobs hosted by the selected instance finish, it is automatically terminated.
Template Parameters#
To deploy the template you need to fill the following parameters.
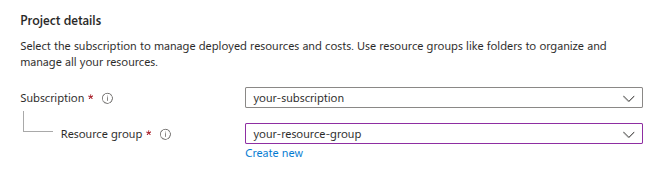
Resource Group and Stack Name#
Select your Subscription and the Resource Group where you want to deploy OpenVidu.
Warning
It is highly recommended to deploy OpenVidu in a brand new Azure Resource Group. Reusing an existing Resource Group can lead to conflicts. The only reason to reuse an existing Resource Group is to use the same IP and Azure Blob Storage Account as a previous OpenVidu deployment. The rest of resources are not reusable and should be eliminated before deploying OpenVidu in the same Resource Group.
Select the Region and choose a descriptive Stack Name. It will be used as a prefix in the name of all the resources created by the template.

Domain and SSL Certificate Configuration#
There are three possible scenarios for this section:
For a production-ready setup, this scenario is ideal when you have an FQDN (Fully Qualified Domain Name) and a Public IP at your disposal. It leverages the services of Let's Encrypt to automatically generate valid certificates.
First, you need to have the FQDN pointing to the Public IP you are going to use.
Then, you need to fill in the following parameters:
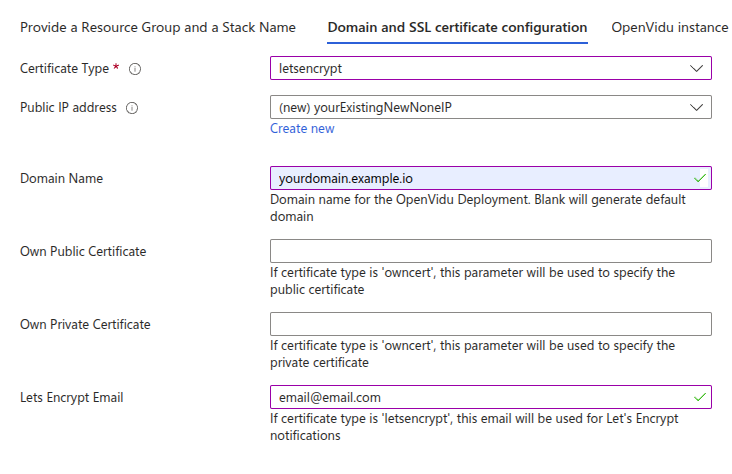
As you can see, you need to specify the Public Ip Address with the Public IP that the domain points to, the Domain Name with your FQDN, and the Lets Encrypt Email with your email address for Let’s Encrypt notifications. These parameters are mandatory.
To deploy OpenVidu in Azure under your Fully Qualified Domain Name (FQDN) using already existing certificates, follow this method.
You need to have your FQDN pointing to a previously created Public Ip.
Also, you need a temporary HTTP server hosting your private and public certificate under a specific URL. These URLs are needed for the instance to be able to securely download and install your certificates.
The configured parameters would look like this:
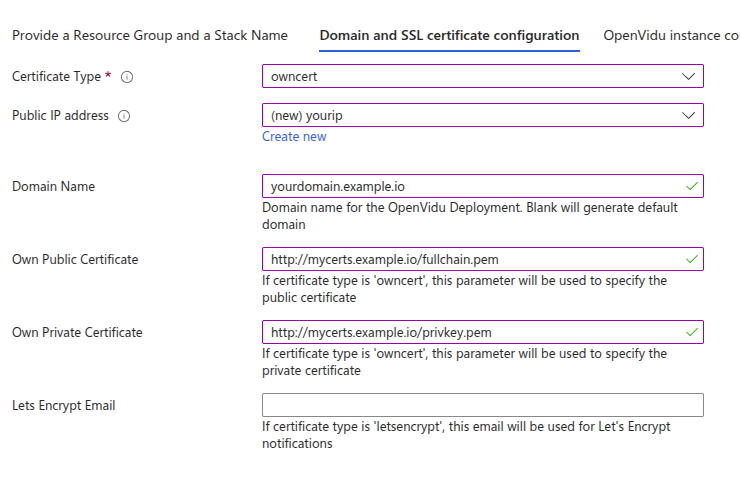
You need to specify at Own Public Certificate and Own Private Certificate the URLs where the public and private certificates are hosted, respectively. The Domain Name, Public Ip Address are mandatory parameters.
Certificates need to be in PEM format and the URLs must be accessible from the instance.
This is the most straightforward option for deploying OpenVidu on Azure when you do not have a Fully Qualified Domain Name (FQDN). This method allows for the immediate use of OpenVidu with ARM Templates.
However, this convenience comes with the caveat that users will need to manually accept the certificate in their web browsers. Please be aware that this configuration is solely for developmental and testing purposes and is not suitable for a real production environment.
These are the parameters needed in this section to use self-signed certificates:
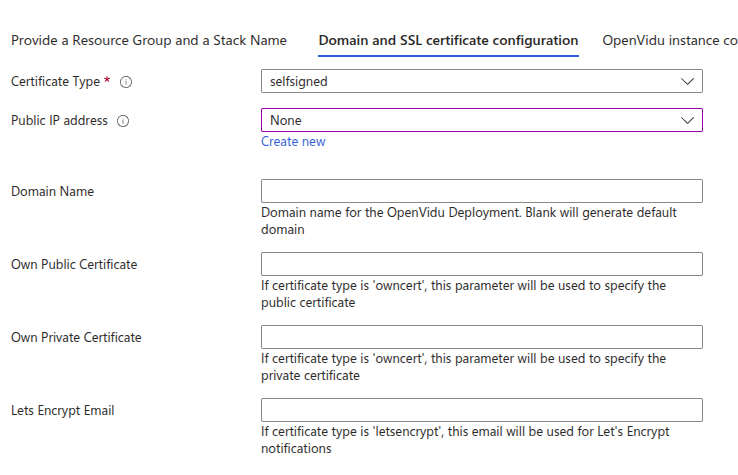
You don’t need to specify any parameters; just select the CertificateType as self-signed. The domain name used will be an Azure-generated one.
OpenVidu Elastic Configuration#
In this section, you need to specify some properties needed for the OpenVidu Elastic deployment.
Parameters of this section look like this:
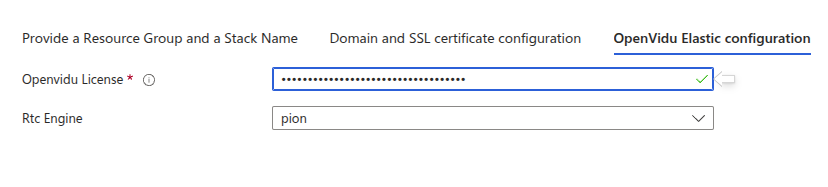
Make sure to provide the OpenVidu License parameter with the license key. If you don't have one, you can request one here.
For the RTC Engine parameter, you can choose between Pion (the default engine used by LiveKit) and Mediasoup (with a boost in performance). Learn more about the differences here.
Azure Instance Configuration#
You need to specify some properties for the Azure instances that will be created.
Parameters in this section look like this:
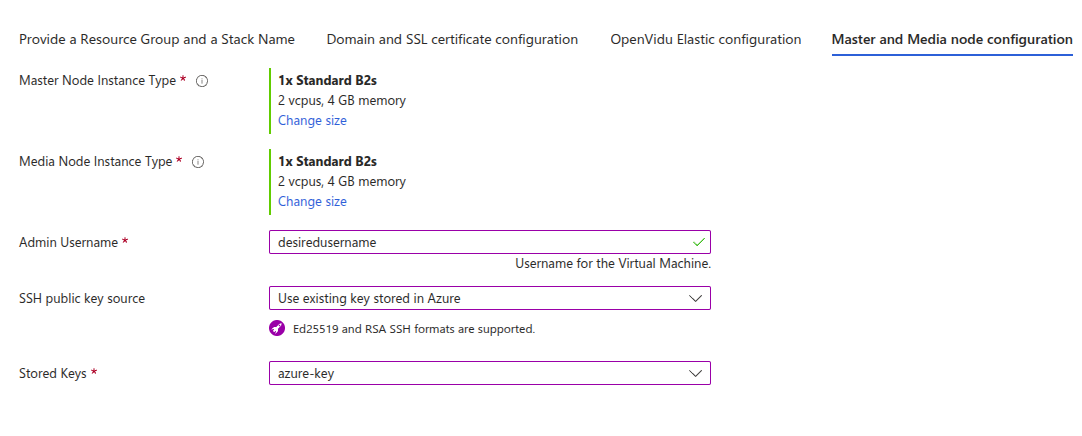
Simply select the type of instance you want for your Master Node at Master Node Instance Type and select the type of instance you want for your Media Nodes at Media Node Instance Type. Fill in the parameter Admin Username that will be set as admin username in the instance. Select the SSH key you've created previously in SSH public key source (or create a new one in the same drop down) to allow you to SSH into the instances.
Media Nodes Scaling Set Configuration#
The number of Media Nodes can scale up based on the system load. You can configure the minimum and maximum number of Media Nodes and a target CPU utilization to trigger the scaling up.
Parameters in this section look like this:
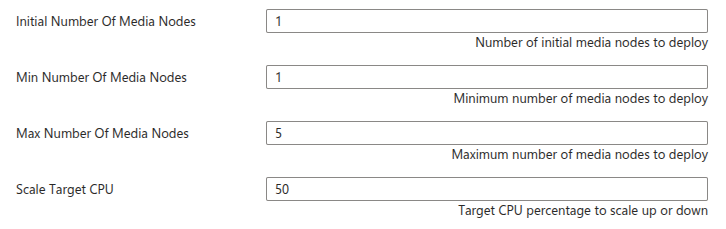
The Initial Number Of Media Nodes parameter specifies the initial number of Media Nodes to deploy. The Min Number Of Media Nodes and Max Number Of Media Nodes parameters specify the minimum and maximum number of Media Nodes that you want to be deployed.
The Scale Target CPU parameter specifies the target CPU utilization to trigger the scaling up or down. The goal is to keep the CPU utilization of the Media Nodes close to this value. The autoscaling policy is based on Target Tracking Scaling Policy.
Scale In#
Azure instances may only wait at most 15 minutes when the Scale Set flags them for termination after detecting a surplus of CPU capacity. This is a problem for those active Rooms hosted by the instance that can last longer than that. To avoid the disruption of active Rooms, we have implemented a custom scale-in strategy that gracefully shuts down flagged instances only after all active jobs have finished.
Due to Azure limitations, this strategy has the minor drawback that it can take up to 5 minutes from the time an instance is flagged for termination until the shutdown process is gracefully initiated.
The name of an Automation Account, needed to execute the scale-in runbook. It must be unique for the resource group it belongs to (leave it blank to use an autogenerated name). This resource cannot be reused between deployments.

Storage Account#
You need to fill some parameters about the storage account that the deployment will use to save the recordings.
Warning
Recordings are not available in OpenVidu v2 Compatibility mode (v2compat) in OpenVidu 3.2.0 deployed in Azure.
Parameters in this section look like this:
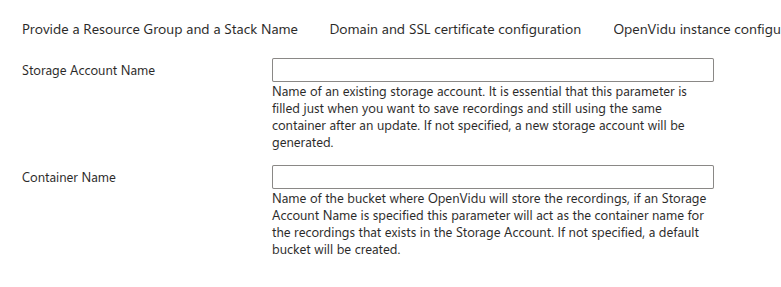
Storage Account Name: leave blank to create a new Storage Account for this deployment. You can specify an already existing Storage Account name if you want (remember it must belong to the same resource group as your deployment).
Container Name is the name that you desire for the container that of the storage account where the recordings will be saved. If you leave it blank it will create the container with name openvidu-appdata.
(Optional) TURN server configuration with TLS#
This section is optional. It is useful when your users are behind a restrictive firewall that blocks UDP traffic. This parameter will only work if you are using letsencrypt or owncert as the Certificate Type parameter.
Parameters in this section look like this:
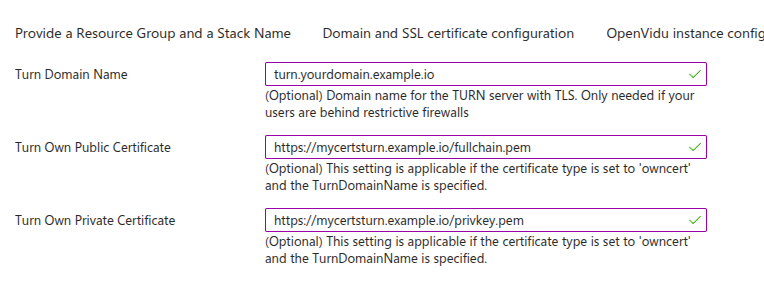
Set the Turn Domain Name parameter to the domain name you intend to use for your TURN server. It should be pointing to the Public Ip Address specified in the previous section.
If you are using letsencrypt as the Certificate Type parameter, you can leave the Turn Own Public Certificate and Turn Own Private Certificate parameters empty. If you are using owncert, you need to specify the URLs where the public and private certificates are hosted.
Deploying the stack#
Whenever you are satisfied with your Template paremeters, just click on "Next" to trigger the validation process. If correct, click on "Create" to start the deployment process (which will take about 7 to 12 minutes).
Warning
In case of failure, it might be that some role failed to create. In this case redeploy in a new resource group and change the Stack Name. To remove a role in a resource group visit Remove Azure role assignments.
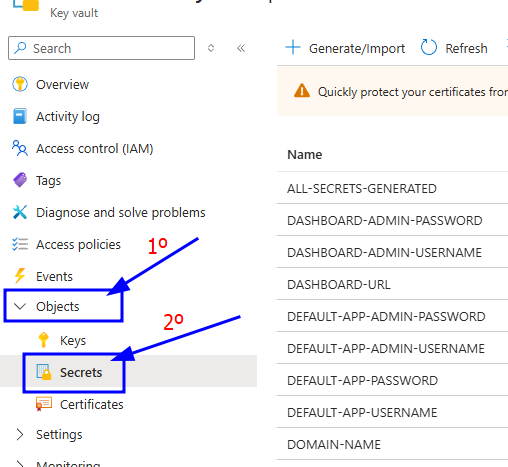
When everything is ready, you can check the output secrets on the Key Vault or by connecting through SSH to the instance:
-
Go to the Key Vault created called yourstackname-keyvault in the Resource Group that you deployed. You can access it from the Azure Portal Dashboard.
-
Once you are in the Key Vault on the left panel click on "Objects" 🡒 "Secrets".
-
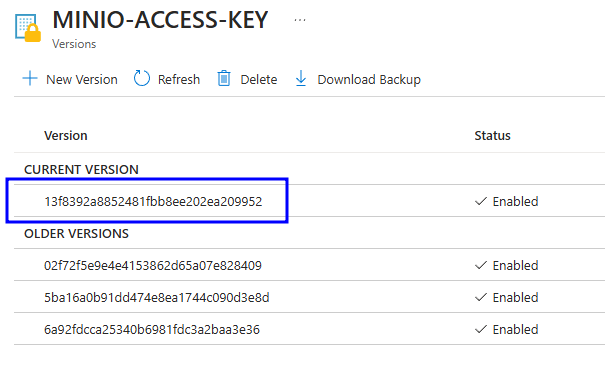
Here click on the secret of your choice or whatever you need to check and click again in the current version of that secret
-
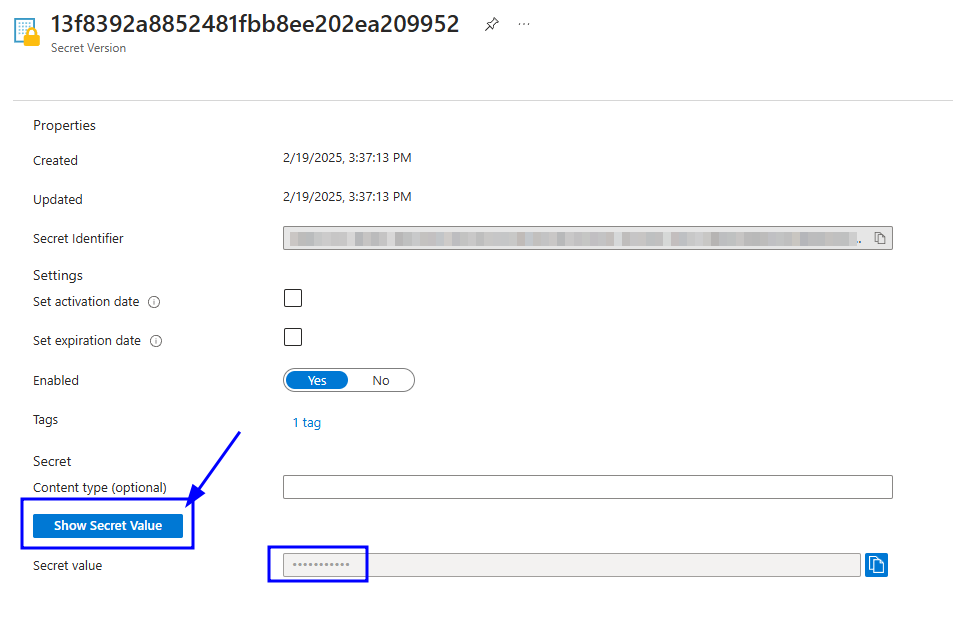
Now you will see a lot of properties but the one you are searching for is located at the bottom and it will be revealed by clicking in "Show Secret Value".
SSH to the Master Node instance and navigate to the config folder /opt/openvidu/config/cluster. Files with the access credentials outputs are:
openvidu.envmaster_node/app.env
Configure your application to use the deployment#
You need your Azure deployment outputs to configure your OpenVidu application. If you have permissions to access the Key Vault you will be able to check there all the outputs (Check deployment outputs in Azure Key Vault). If you don't have permissions to access the Key Vault you can still check the outputs directly in the instance through SSH (Check deployment outputs in the instance).
Your authentication credentials and URL to point your applications would be:
-
Applications developed with LiveKit SDK:
- URL: The value in the Key Vault Secret of
DOMAIN-NAMEor in the instance inopenvidu.envas a URL. It could bewss://openvidu.example.io/orhttps://openvidu.example.io/depending on the SDK you are using. - API Key: The value in the Key Vault Secret of
LIVEKIT-API-KEYor in the instance inopenvidu.env. - API Secret: The value in the Key Vault Secret of
LIVEKIT-API-SECRETor in the instance inopenvidu.env.
- URL: The value in the Key Vault Secret of
-
Applications developed with OpenVidu v2:
- URL: The value in the Key Vault Secret of
DOMAIN-NAMEor in the instance inopenvidu.envas a URL. For example,https://openvidu.example.io/. - Username:
OPENVIDUAPP. - Password: The value in the Key Vault Secret of
LIVEKIT-API-SECRETor in the instance inopenvidu.env.
- URL: The value in the Key Vault Secret of
Troubleshooting initial Azure stack creation#
If something goes wrong during the initial Azure stack creation, your stack may reach some failed status for multiple reasons. It could be due to a misconfiguration in the parameters, a lack of permissions, or a problem with Azure services. When this happens, the following steps can help you troubleshoot the issue and identify what went wrong:
- Check if the instance or instances are running. If they are not, check the Azure deployment events for any error messages.
-
If the instance or instances are running, SSH into the instance and check the logs of the following files:
/var/log/cloud-init-output.log/var/log/cloud-init.log
These logs will give you more information about the Azure stack creation process.
-
If everything seems fine, check the status and the logs of the installed OpenVidu services.
Configuration and administration#
When your Azure stack reaches the Succeeded status, it means that all the resources have been created. You will need to wait about 5 to 10 minutes to let the instance install OpenVidu. When this time has elapsed, try connecting to the deployment URL. If it doesn't work, we recommend checking the previous section. Once finished you can check the Administration section to learn how to manage your deployment.